Migrating My Blog to Hugo and Azure
Overview
Background
In 2015 (6 years ago now!), I created my blog on GoDaddy using their "Managed WordPress" service. I also created a domain with them and added an SSL certificate. I'm a developer/architect and don't do anything with WordPress during my day job. I write a lot of markdown docs for README files and other documentation using a static web-site generator called Hugo.
I really like the experience of writing docs in VS Code and Markdown using Hugo. The experience is fast and it's not that different than
what I do to write code - update some files and get them committed to some kind of git repository somewhere.
I was not happy writing new posts in WordPress -- it worked, but there were things I didn't like. The blog was using (and showing) features I didn't like or use, it was looking a little dated to me, and the formatting I thought wasn't that great. I could probably have found a way to address all of these things, but I didn't really want to invest the time (I don't do anything else with WordPress) and thought it was at least worth a look to see what it would take to use Hugo for my blog.
What I found was super exciting - and I wanted to share the experience. 😄
Set up a Hugo website
Hugo is a framework for building websites -- and my experience so far has been writing Markdown docs that turn into the site. Building the site is BLAZING FAST and the site itself is crazy fast too. If you are comfortable with Markdown -- it's definitely worth your time to take a look.
Install Hugo
If you don't already have Hugo installed, you need to install it. For details, see the official install docs, but it's as simple as:
Mac (uses Homebrew)
1brew install hugo
Windows (uses Chocolatey)
1 choco install hugo --confirm
Find a theme
To find a theme that your site can use, there are a handful of places you could go (search for "Hugo themes"), but the official one is here: https://themes.gohugo.io/
For my blog I chose this one: https://themes.gohugo.io/themes/hugo-clarity/
The theme docs should show you how to get up and running fast. For example, the theme above had these instructions:
1hugo new site yourSiteName
2cd yourSiteName
3git init
4git submodule add https://github.com/chipzoller/hugo-clarity themes/hugo-clarity
5cp -a themes/hugo-clarity/exampleSite/* .
The first few lines create a hugo-driven website (which will create a directory), send you into that directory, initialize it as a git repository, and then add a submodule for the theme. This is how you can add the theme to your site and then have a way to stay up to date easily if the theme changes.
The last line will copy the "exampleSite" from the theme into the "working area" for your site - so you can see how pages are written / etc.
Run the site locally
To see what your site looks like (and have it update whenever you make changes to files and save them), just run the following command in your site directory:
1hugo serve
Then browse to http://localhost:1313
Write your own content / apply configuration
The easiest way to add pages to your site is with a hugo new command -- it takes advantage of the achetypes available in your theme / site.
1hugo new --kind post post/slug-for-your-post.md
The archetype above is post and the new Markdown file will be placed in content/post/slug-for-your-post.md (it will tell you that when you
run the command).
There is metadata about the post at the top of the file - review / update that and then write your content. To see the page, either update the
Draft: true line to be false or simply remove the line. Then (assuming you're running hugo serve) the page should be available for you to
see!
Posts / content generally aren't visible until the date in the metadata for the post. Use a future date to "schedule" something to become available.
Check out the docs for the theme you're using to learn more.
Get your code committed to GitHub
I'm guessing you know how to do this -- but you just need to create a repository, and then follow the instructions there.
Commit your code locally, and push it to the new GitHub repository you've created.
That's it for this step!
Deploy your site to a static site platform (e.g. Azure)
This step is really cool. I had heard about Static Web Apps on Azure and did a general search for Azure Static Site Hugo GitHub and found this official link:
https://docs.microsoft.com/en-us/azure/static-web-apps/publish-hugo
The static web apps have a "free" plan that has everything I needed - hosting for the site, along with a free SSL certificate. For the traffic that my blog gets, this is plenty and I shouldn't have to pay much of anything (if at all).
The really cool part of the setup is that you say that you want to deploy from GitHub, sign in and authorize it, and then you pick your repo and branch:
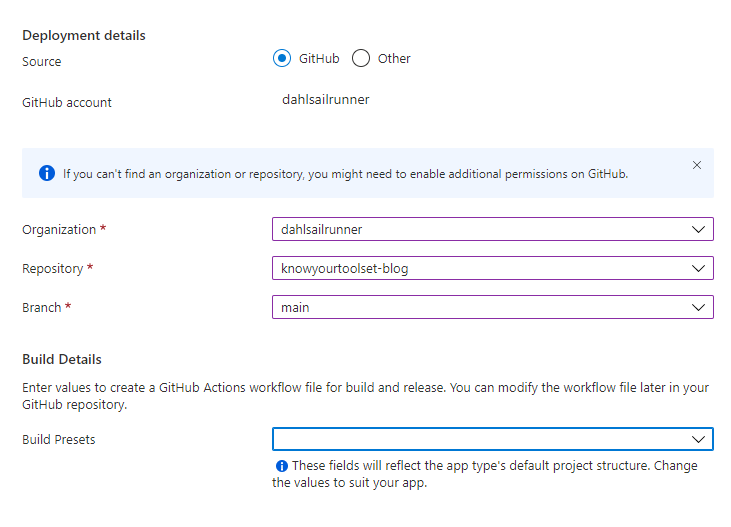
And then the SUPER AWESOME next step is when you open the Build Presets drop-down:
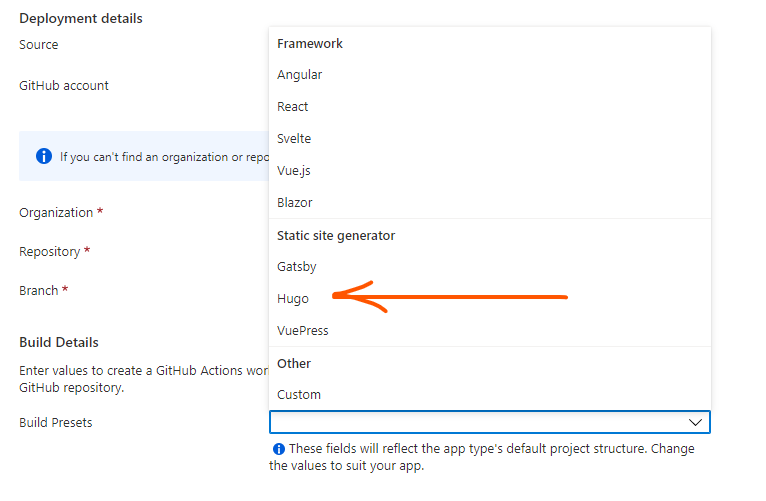
When you finish and Review + Create, a new GitHub action will be set up and your site is being deployed! Now any time you commit change to the main branch, it will get automatically deployed!
How cool is that??
By the way, if you don't want to host on Azure, there are other options:
- Netlify
- AWS uses Amplify - not quite so simple it would appear, but definitely possible to achieve same as above
If you hit the first link above (on gohugo.io) - you'll see even MORE hosting and deployment options -- including GitHub itself!
So if you wanted your blog to be at https://YOUR_GITHUB_USERNAME.github.io - just follow these steps and you're done!
Migrate existing content (if you have any)
This section and the one that follow only pertain if you have existing content somewhere that needs migrating - I had both content and a custom domain.
I wanted to preserve the "slug" and path for the original posts - in the unlikely event that any of them were linked or referenced elsewhere, those links should still work.
The original links were always like YYYY/MM/some-slug-name/ -- an example is 2021/03/add-k8s-cluster-to-windows-terminal.
So I used the following hugo new command to create a new version of my post above:
1hugo new --kind post 2021/03/add-k8s-cluster-to-windows-terminal.md
And then I had to modify the config/_default/params.toml file - search for mainSections:
1# directory(s) where your articles are located
2mainSections = ["post", "2015", "2016", "2017", "2018", "2019", "2020", "2021"] # see config details here https://gohugo.io/functions/where/#mainsections
Then it was just a matter of creating the markdown I wanted for the posts. I didn't have that many so it went pretty quickly.
Transfer domain (optional)
I already had the knowyourtoolset.com domain, and also routed the subdomain of <www.knowyourtoolset.com> to the same place -- I wanted to preserve that behavior with the new version of the site. I started down the path of updating the DNS at GoDaddy for this, but then discovered I could easily transfer that to Azure - which is where my site was anyway. Then I would have everything right there and be able to manage it from one place.
I did not discover how to transfer the domain in the Azure Portal, but found this gold mine of a post that enabled me to use the API to do it.
https://jrudlin.github.io/2018/10/27/domain-name-registration-transfer-to-azure-app-service-domains/
The process involved enabling the transfer from GoDaddy (which provides a code to your email), invoking the API above, and then approving the transfer from GoDaddy to expedite the process.
Then I followed the "Add a Custom Domain" steps for the Azure Static Apps.
Voila! 🎉