Add K8s Cluster to Windows Terminal
I’ve been doing more and more with Kubernetes lately, and came across an example by Brad Wilson that showed the Kubernetes context in the prompt and thought it would be really awesome if I could add that to mine. I was generally happy with the PowerLevel10K-Classic theme, but wondered about applying a tweak that could include the Kubernetes (k8s) context info. Here’s the result for me (k8s context circled):

This is really awesome and makes me (in Scott Hanselman‘s language) “happy” every time I open the Terminal to do or look at stuff.
Take an Existing Theme and Make it Your Own
While I was happy to achieve my goal of getting k8s context info into my prompt, the more powerful discovery here is not simply the addition of the Kubernetes info, but that there are many different “segments” that might make sense for YOU to put in YOUR prompt.
Here are some segment highlights (a bunch of others exist — check the “Segments” area of the Oh-My-Posh docs):
- .NET: Display the current .NET SDK version
- AWS: Display current AWS profile / region
- Azure: Display current subscription
- Kubectl: Display current cluster and namespace if set
In other words, if there’s a handy piece of information that would help make you happy in a Terminal session, there’s probably a segment for it already defined!
Fonts, Color Schemes, oh-my-posh, and a Theme
To get started, I wrote some steps / notes in a gist that can be found here: https://gist.github.com/dahlsailrunner/ec99e195b2a4903748a74df64a1f1a94
Basic Steps (covered in detail in the gist)
- Install Windows Terminal
- Add a font (recommended: MesloLGS NF) – download / install each TTF file
- Set up a color scheme (use Cobalt2 if you don’t have one already in mind)
- Add posh-git and oh-my-posh modules
- Create a Profile and set a theme (use
Get-PoshThemes) to see choices
You should end with one of the existing themes chosen and set, along with a configured PowerShell profile set up.
Cool Part 1: Customize a Theme
For this, you should install the Windows version of oh-my-posh. It’s the “windows” tab there — use Scoop (you may need to install that too).
Once you’ve done that, close the terminal and open a new one (to make sure you get an updated path that includes oh-my-posh), and run this command:
1oh-my-posh --print-config
This will “dump” the current theme configuration and allow you to copy/paste it into a new file. This file is what you can edit to make the changes you want. For my purposes, I created a file in the root prompt directory (~ or C:\users\) called custom-10k.json.
The name of “custom-10k” can of course be whatever you want — I was customizing the powerlevel10k_classic theme and just chose a name for this new file that meant something to me.
To preview any changes you make to the file, you can use this command:
1oh-my-posh --config ~/custom-10k.json --shell universal
This will show a line using that prompt followed by your normal / currently-set one. If the new one looks good, then update your PowerShell PROFILE to more permanently use the new file:
1Set-PoshPrompt -Theme ~/custom-10k.json
Cool Part 2: Setting the Kubernetes Segment
I wanted to replace the right-hand side of the standard prompt with the Kubernetes cluster info.
Inspecting the standard powerlevel10k_classic theme json file (which I copied / pasted into my new custom-10k file from the –print-config command above) I found this content:
 1{
 2  "type": "prompt",
 3  "alignment": "right",
 4  "segments": [
 5    {
 6      "type": "session",
 7      "style": "diamond",
 8      "foreground": "#D4E157",
 9      "background": "#546E7A",
10      "leading_diamond": "\uE0B2",
11      "properties": {
12        "postfix": " <#26C6DA>\uE0B3</> "
13      }
14    },
15    {
16      "type": "time",
17      "style": "plain",
18      "foreground": "#D4E157",
19      "background": "#546E7A",
20      "properties": {
21        "time_format": "15:04:05",
22        "postfix": " \uF017 "
23      }
24    }
25  ]
26}
The segments used in the right section by default are the session and time segments. I replaced the segments array with this:
 1"segments": [
 2  {
 3    "type": "kubectl",
 4    "style": "diamond",
 5    "foreground": "#D4E157",
 6    "background": "#546E7A",
 7    "leading_diamond": "uE0B2",
 8    "properties": {
 9      "prefix": " \uF1D1 "
10    }
11  }
12]
That was the only change I needed to make to the file – and I was happy with the results!
So updating my PROFILE to set the new theme updated my prompt as shown at the top of this post. Awesome!!
Kubectl Segment Notes
The context name and namespace are what are shown here – and this name can be different than the API endpoint. I set the context name to something a little more human-readable than the cluster endpoint. It’s the context.name and current-context values in a kubeconfig file that come into play here.
To quickly switch between contexts (which are each defined in different kubeconfig files for me), I set up the following functions in my PowerShell PROFILE:
 1function Set-Kubectl-Aws-ConsumerIdentity-Sat()
 2{
 3  $Env:KUBECONFIG = "C:\users\dahls\.kube\sat-context"
 4}
 5
 6function Set-Kubectl-Aws-ConsumerIdentity-Dev()
 7{
 8  $Env:KUBECONFIG = "C:\users\dahls\.kube\dev-context"
 9}
10
11function Set-Kubectl-CaaS-NonProd()
12{
13  Set-ExecutionPolicy Bypass -Scope CurrentUser
14  c:\users\dahls\downloads\ucp-bundle-erik.dahl@workplace.com\env.ps1
15  Set-ExecutionPolicy Unrestricted -Scope CurrentUser
16}
17
18function Set-Kubectl-Local()
19{
20  $Env:KUBECONFIG = ""
21}
Cool Part 3: Finding a Character For the Prefix
This part – and the \uF1D1 Prefix value above – rely specifically on the font you are using for your prompt.
I’m using the recommended MesloLGS NF font, and that \uF1D1 is the little symbol that shows up to the left of the kubernetes context info.
If you’re using the MesloLGS NF font, you can use this handy cheatsheet as possibly the best and easiest way to identify the character / icon you want. You can search or browse from there.
If you’re on Windows, you can also use the Character Map app and choose the MesloLGS NF font within it (which is what I did since I didn’t know about the cheatsheet first). Then it’s just a matter of looking through all of the different icons available (there are a LOT) until you find one that you want to use for the prefix (or postfix).
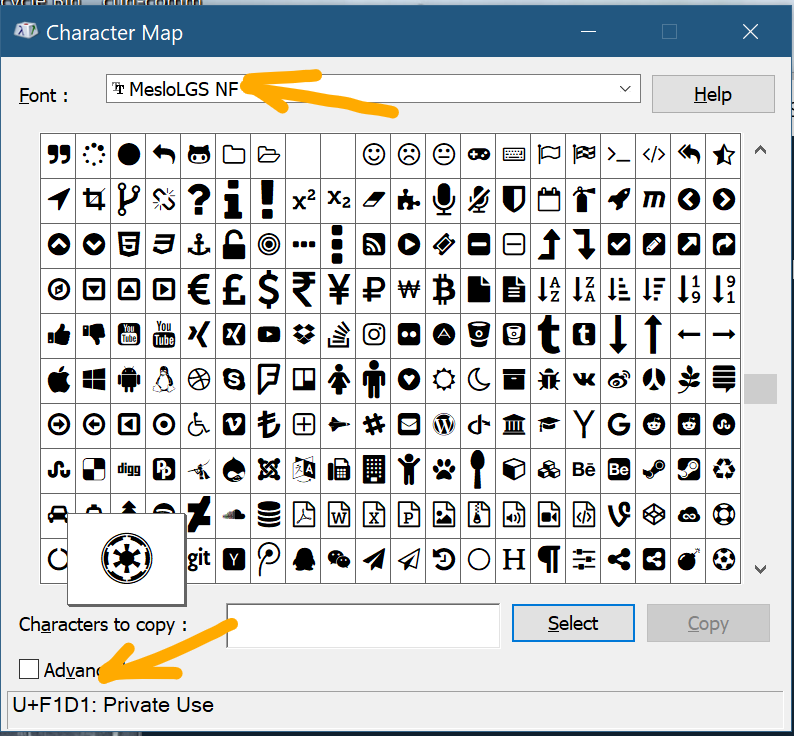
You provide the value for the character (and I put a leading and trailing space on it), and you should be good to go!
That’s it for this post – happy prompting! 🙂