Visual Studio Tips and Tricks
Overview
If you're working with Visual Studio on a daily basis, taking a little time to customize your experience and knowing about a few key features can help make your time spent both more productive and more joyful -- if you're happy when you're in the IDE (Integrated Development Environment -- Visual Studio is one of those) you'll often do better work and get more satifaction doing it.
The notes and tips I provide here are things that help ME work better and more happily. Some things may resonate strongly with you and you are welcome to follow these suggestions exactly as I follow them, but the most important thing in all of this is to make your IDE experience one that makes YOU happy and more effective.
One way to take action on this (and many other things) is to dedicate a pomodoro to it - meaning, spend 25 minutes of focused time doing nothing but experimenting with some IDE settings or experimenting with a feature. 25 minutes is a manageable block of time where you really can get some excellent value -- and if that works, find some time for more in subsequent days! :)
Fonts
A good choice in font settings can contribute to making you actually happy to look at the IDE and get down to business. As I've gotten older, my eyesight has gotten a a little worse and changing a few different settings to use a large font has helped a great deal -- and the reverse could be completely opposite! If your eyes are telling you that everything in the IDE is HUGE and you'd be happier if it was smaller - then make the changes!
One of the challenging things to figure out in the Tools->Options->Environment->Fonts and Colors
settings panel is which choice in the "Show settings for:" drop-down list can be used to change
different components of the IDE.
I've created the screenshot below that illustrates some of the settings that I found most useful to adjust:
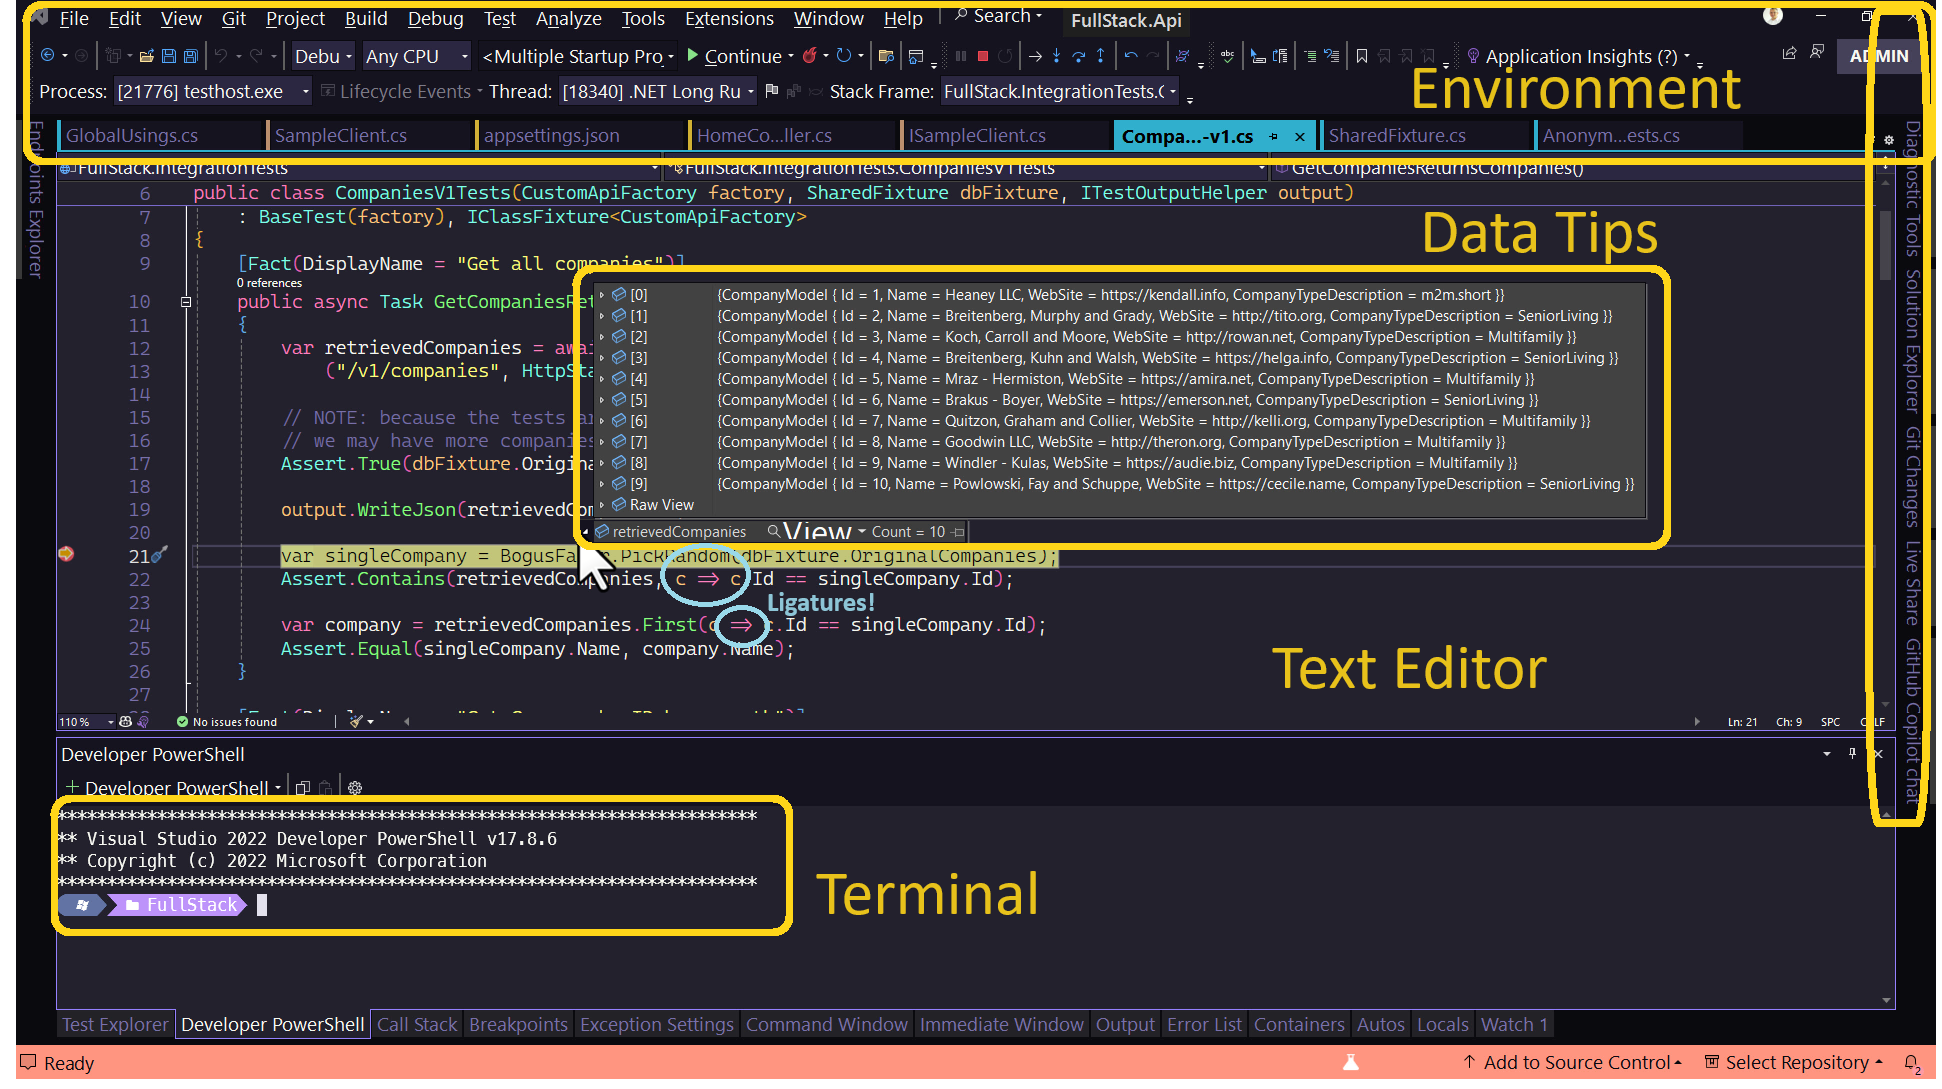
- Environment: This choice controls the menu items, tab titles, solution explorer items, and more.
- Text Editor: This is the main code pane - if you've done any font settings before you've probably found this one already.
- Data Tips: This controls the text of any tooltips that show up - and this includes debug quick watches where you hover over a variable to see what's in it.
- Terminal: Controls the Terminal (Developer PowerShell embedded in Visual
Studio) and if you're using something like Oh-My-Posh like I am, you may want to set the
font for this -- I've got mine set to
Meslo LGS NF- which can be installed using the Oh-My-Posh font CLI, or explore options on Nerd Fonts.
Ligatures
Ligatures create what looks like single characters for things like != or => in
your editor. The circled items in the above screenshot show => as a single character.
I've found that it makes the code easier to read. I'm using Cascadia Code
(the PL Light variant) as the font in Text Editor. The PL in the font
name indicates Programming Ligatures and so you can choose to use Cascadia Code without
them if you don't like them.
Other options like Fira Code, JetBrains Mono, and Hasklig seem like good font options that include ligatures and are downloadable from Nerd Fonts.
Colors and Themes
Themes
A color theme of your choosing is another thing that simply makes your experience and
time spent inside the IDE more pleasant. The built-in-ones are Blue, Dark, and Light
and are fine, but not that exciting -- maybe that's just what you're looking for, though.
There are a whole lot of themes available for you to choose from, though.
Any of the themes you want to try are downloaded as a .vsix file that get installed
to Visual Studio when you "run" them (just double-click once downloaded).
Then pick the theme you want from the Tools->Theme menu option.
A particularly good theme in my opinion is the Dracula Theme, and I have gone further than this excellent theme and upgraded to the PRO version of it - which includes some different variants as well.
I'm using Dracula Pro in the screenshot above.
More with Color
When you choose a theme that will drive many of the colors that are used throughout the IDE. There are a couple of additional settings that can make a nice difference, though. Both of the items below can be seen in the screenshot above.
Brace Pair Colorization
This option (Tools-> Options-> Text Editor->"Enable brace pair colorization") will use matching colors for the open/close pairs of braces - which can be parentheses, curly braces, or square braces.
The screenshot above shows some simple coloring of the pairs - look at the parentheses and the curly braces for the class definition. This is handy for closing out multiple braces and just visually helpful.
This is a great feature and is now built into Visual Studio but was formerly an extension called "Rainbow Braces" by Mads Kristensen.
Colorize Tabs by Project
If you have more than one file (tab) open, and also have more than one project in your solution, specifying "Colorize Tabs by Project" can help. (Tools->Options->Environment->Tabs and Windows -> "Colorize document tabs by:")

Other options for separating the colors are by file extension and regular expression.
There is a colored bar on available tabs, and the active tab is highlighted with the color for that group - again visible in the screenshot above.
Productivity
Going beyond just "look and feel" there are some great features / shortcuts that you really should be aware of.
Add New File
When you need to add files to your project(s), it often involves clicking through the Solution Explorer and choosing a type and providing a name.
With the Add New File feature (now built into Visual Studio but formerly an extension by Mads Kristensen),
you can type in things like the following after selecting the right "level" of things in the Solution
Explorer and pressing Shift-F2:

SomeClass.cs: Creates a new C# class fileSomeDir/SomeClass.cs: Creates a new directory calledSomeDirand then creates a class file inside that new directory.SomeDir/: With the trailing slash, it simply creates a new directoryIDoSomething.cs: Creates an interface file in the directory.- Lots more possibilities exist -- but know that it creates both files and directories!
Shift-F2 is your friend!
Comment in and out
If you're working with code, a common activity is commenting out a block of code you don't want to run.
That's ONE keyboard shortcut you should definitely know: Ctrl-K, Ctrl-C -- i.e. hold down the Ctrl key,
then press K then C one after the other. Any highlighted lines will be commented out.
Note that if NO lines are highlighted/selected, then current line will be commented out.
To comment something back in (and enable it to be executed again), Ctrl-K, Ctrl-U will do the trick.
Clipboard History and Copy/Cut/Paste Nuances
If you're doing some copy-pasting, sometimes you need to paste the same thing you copied not most recently,
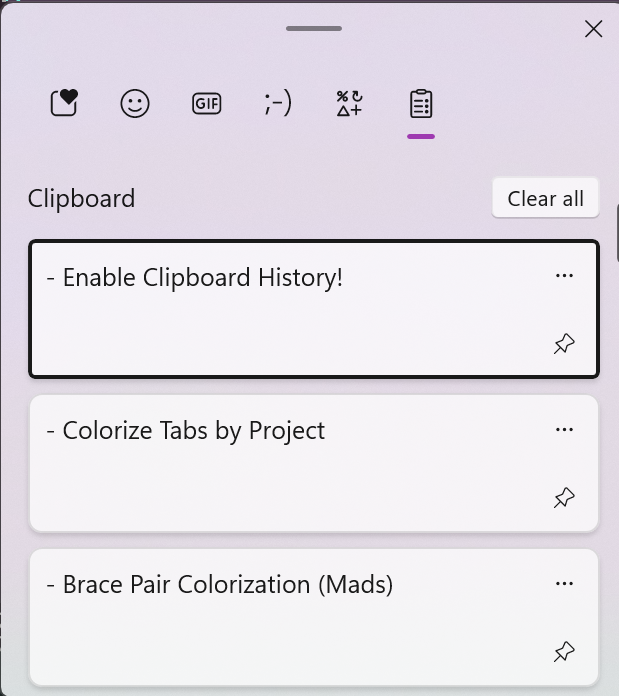
but shortly before that. If you type Win-V (the Windows, or Start key) instead of Ctrl-V you should have
the option to enable clipboard history if you haven't already done it. Once you've enabled Clipboard History,
typing Win-V will get you a menu for you to select what you want to paste:
Then just pick the one you want to paste. Awesome! Once you've pasted something, to paste that SAME
THING again, you can use Ctrl-V. If you need a different something from the history (including the
most recent thing you copied, if it was different from what you just pasted), you'll need the Win-V combination
again.
Note that "Clipboard History" is a Windows feature - nothing specifically to do with Visual Studio.
One other thing to keep in mind is that if you DON'T have some content highlighted when doing a copy (Ctrl-C)
or cut (Ctrl-X) operation is that the WHOLE LINE will get copied or cut. This is pretty helpful.
The same "whole line" scope is applied if you Shift-Delete -- that will delete the current line.
Paste JSON (or XML) as Class
Almost all of us work with APIs. Let's say you had an API returning you something like this (or you have some appsettings.json content that you want to model an Options<T> class on haha):
 1{
 2  "ConnectionStrings": {
 3    "SqliteFilename": "database.sqlite"
 4  },
 5  "UnifiedPlatform": {
 6    "Authority": "https://www.my-identityserver.com/identity",
 7    "SwaggerClientId": "apicodesample",
 8    "ApiName": "api",
 9    "AdditionalScopes": "write"
10  },
11  "LaunchDarkly": {
12    "SdkKey": "SomeKey",
13    "IncludeDebugLogs": "false"
14  }
15}
You could hand-write a class structure to model the above, but if you use the Paste JSON as Classes feature you can make
it easier on yourself!
Copy the above JSON, then in Visual Studio - in a code file, choose Edit->Paste Special->Paste JSON as Classes and what gets pasted into your code is the following:
 1public class Rootobject
 2{
 3    public Connectionstrings ConnectionStrings { get; set; }
 4    public Unifiedplatform UnifiedPlatform { get; set; }
 5    public Launchdarkly LaunchDarkly { get; set; }
 6}
 7
 8public class Connectionstrings
 9{
10    public string SqliteFilename { get; set; }
11}
12
13public class Unifiedplatform
14{
15    public string Authority { get; set; }
16    public string SwaggerClientId { get; set; }
17    public string ApiName { get; set; }
18    public string AdditionalScopes { get; set; }
19}
20
21public class Launchdarkly
22{
23    public string SdkKey { get; set; }
24    public string IncludeDebugLogs { get; set; }
25}
Not bad! Some of the Pascal-casing for the class names isn't quite right, but this pasted code is a great start and saves a bunch of time!
If you're working with SOAP services (or other XML-based payloads) the same technique can apply to XML content you copy into the clipboard for pasting.
API-Specific Features
A lot of (at least my) development in ASP.NET Core involves APIs.
Both the Endpoints Explorer and the .http file support are super handy features you
should be aware of.
Here's a screenshot of the (View->Other Windows->) Endpoints Explorer:
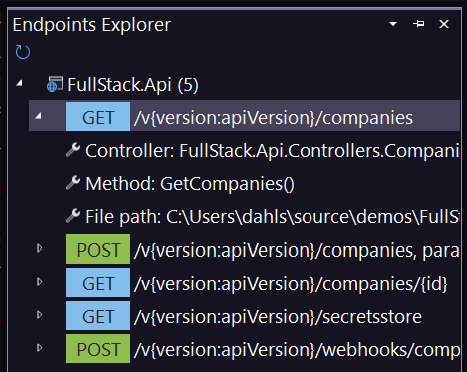
You can see in the expanded GET companies method that it shows where the method
is defined and if you right click there are options to "Open in the Editor" (this will
open the code file in the Text Editor area), and to "Generate a Request" which will
create a request in an .http file against that endpoint.
A file with a .http extension is simply a text file that defines a set of
one or more requests you might like to send to various HTTP endpoints like you
might do with Postman or Insomnia - and is a feature now built-in to Visual Studio.
Here's a screenshot of a sample file:
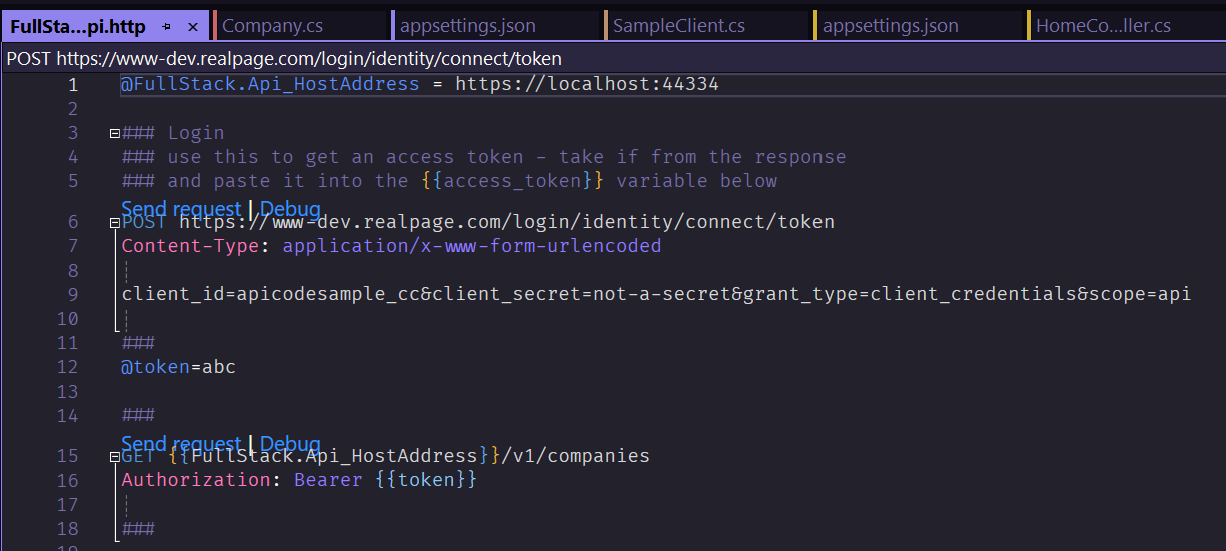
Each different request needs to be separated by a line with ### at the beginning.
And you can see I've got a POST method to an OAuth2 server to get an access_token
for one request and then can set a variable to be used for subsequent responses.
Note that as of this writing that variable assignment needs to be done by you in the
editor after the POST response comes back. "Auto-assignment of variables from
HTTP response content" is not yet supported in .http files.
The benefit of using .http files is that you don't need to navigate around a
Swagger UI (which you may not even have for your API) to find the endpoints, fill
out content, and then execute the request. It's also a good way to document
"typical" requests that a different developer may want to run when they initially
start working with the API project.
Conditional Breakpoints
If you do any debugging at all, you've probably set breakpoints. At the breakpoint, youo can inspect variables and carefully watch the execution of your code.
But sometimes you want to break to see how one specific iteration of a loop is behaving.
You've got some kind of foreach loop or similar, and you want to break
on a very specific iteration -- maybe the 11th item, or the one where the
customer name is "Erik" to see why something went wrong on that iteration.
You could set your breakpoint in the loop and iterate until you get to the instance you're looking for, but you can also use the handy-but-seldom-used "conditional breakpoints" feature. When you set a breakpoint, you can hover over the red dot for the breakpoint and choose "Settings". You get a new pane of sorts called the breakpoint settings pane, which looks like this:
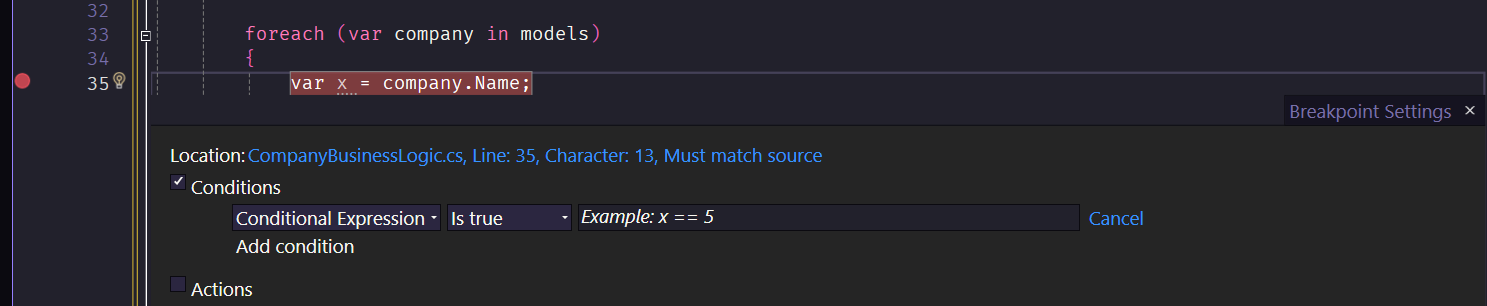
You can see the "Conditions" item in the breakpoint settings. And the "Conditional Expression" is a drop down that also contains "Hit Count" - meaning you could use it to stop on the 11th time (or whatever time) you hit that breakpoint. With "Conditional Expression" you can specify an expression like "company.Id == 23" in my example above to stop on the iteration where that expression is true.
Lots of flexibility here for you to take advantage of and bring you debugging prowess to the next level!
In Closing
Features abound in IDEs like Visual Studio, and it's definitely in your best interest as a professional working with code to take some time to get to know it well and to use it in ways that make you both very efficient and joyful!
If you have tips that are particularly helpful to YOU, share them in the comments below - I'd love to hear about them!
Happy coding!