Moving Authentication From an ASP.NET Site Into IdentityServer4
tl;dr: Just show me the code: https://github.com/dahlsailrunner/secure-authentication-is4
I just published a course regarding secure authentication in ASP.NET websites, and the course and its code repo focused exclusively on ASP.NET Identity (in both Core and Framework projects). An early question came up regarding how to do this with a single-page application (SPA) like an Angular app.
The answer to that is really the same as if you wanted to support mobile apps, or even multiple websites: move authentication into a standalone OpenID-Connect identity provider; a great solution for that is IdentityServer4 (now transitioned to Duende IdentityServer).
The GitHub repo for the original code has two websites – they both show the exact same things and are two different versions of the same website:
- Globomantics.Core: ASP.NET Core Razor Pages site using ASP.NET Core Identity
- Globomantics.Framework: ASP.NET Framework WebForms site using ASP.NET Identity
The code there demonstrates many aspects of ASP.NET Identity and various security practices you may want to adopt – and it uses a pre-existing user database to show how you might adapt an existing site / database to use ASP.NET Identity without needed to completely rewrite your existing site.
But the code stopped there — moving authentication into a standalone identity service was not covered or discussed. So I created a new GitHub repository which would do exactly that — move the authentication and ASP.NET Identity functionality into an application running IdentityServer4 – and it runs this identity service by using docker-compose.
The resulting repo is here: https://github.com/dahlsailrunner/secure-authentication-is4
There are lots of notes in the README for the repo, and some other clarifications are below.
Creating an IdentityServer4 Project
I started the move by creating a new empty repository and adding a new solution to it, along with a new ASP.NET Core project to it. The quickstart documentation for IdentityServer4 has a very good walkthrough on how to set up IdentityServer4 in an application and I don’t want to repeat that documentation here.
Short version:
- Create your ASP.NET Project
- Add the IdentityServer4 NuGet packages you will use (including
IdentityServer4.AspNetIdentityfor this use case) - Get
Startup.cscoded with the logic you need - Provide configuration for some initial OIDC clients
Moving ASP.NET Identity Authentication into the IdentityServer
I’ve added a bunch of notes about this here: https://github.com/dahlsailrunner/secure-authentication-is4#identityserver4-notes
The notes kind of boil down to this:
- Move the
Areas/Identitystuff, and change any required namespaces - Move most of the authentication-related code from
Startup.cs - Move the custom Identity folder with all of the
CustomUserStoreand other custom files - Modify the original project to refer to the new IdentityServer as its OpenId-Connect (oidc) provider. This last is described here.
Why Docker Compose?
When developing “interesting” (read: real world) projects, there are almost always some kind of setup steps to be completed to enable running and debugging the solution. For this identity service, there are a few things at play here:
- Email verification: we need to be able to send an email, view its contents, and click links within them.
- Database: we need to be able to access our existing user database, and I’d also like to store our IdentityServer configuration and operational data in a database.
- HTTPS/SSL: I’d like to be able to run the identity server using HTTPS with a real SSL certificate and DNS name – just like I’d do in a higher-level testing or production environment.
- Logging: I’d like to be able to view logs for local development in a very similar way to what will be done in a higher-level or production environment.
And with all of this, I’d love to be able to NOT require new developers to have to go through a bunch of steps to set all of this up.
The minimum steps here will be:
- Ensure Docker Desktop is installed (once done this just needs to be kept up-to-date, and other projects using docker-compose are even easier).
- Add any
HOSTSentries for DNS names that you want to expose from your docker projects - Trust a certificate that is in the project (might not be necessary depending on how certs for the project were generated and what authority signed them)
- Ensure you have a way to edit and run the code projects (like having Visual Studio installed)
- Then just run the project(s)!
Setting Up Docker Compose
The “end state” of what will end up running is shown in the diagram here along with an abbreviated version of the docker-compose.yml file.
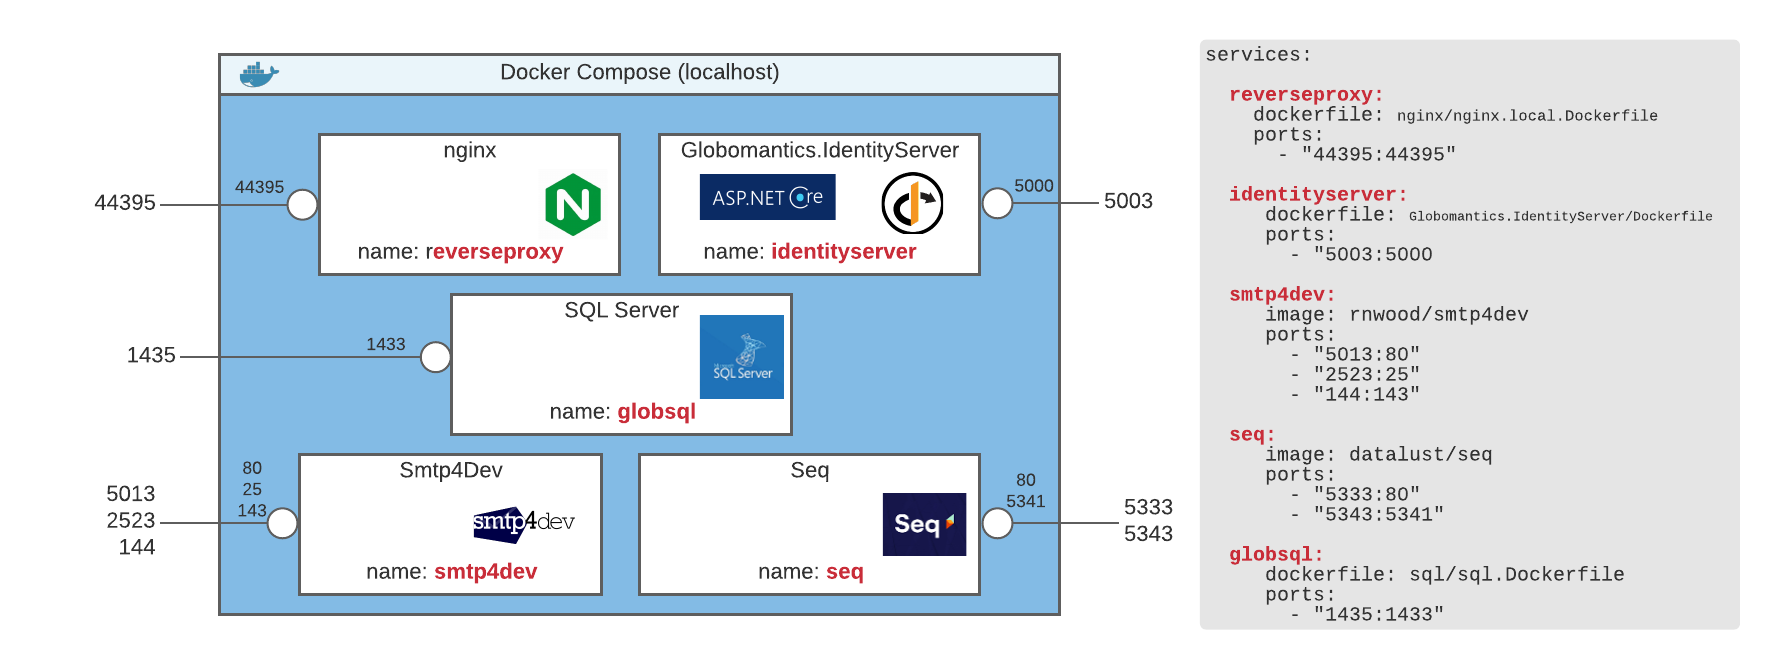
The blue box here represents everything running via docker-compose. A network internal to docker compose is created, and each service can also be exposed to the host (meaning: things running outside the compose environment).
Based on the diagram above, if the Globomantics.IdentityServer web application needs to refer to the Smtp4Dev container to send an email, it can do so by referring to the name of smtp4dev and the port of 25 — all of this is inside the compose environment.
If we later want to open a web browser to see any emails that we sent, we could open a browser on our host and use http://localhost:5013 as the address.
The same concept drives the database connection strings in the projects. Globomantics.IdentityServer refers simply to the servername of globsql, since the default port for SQL Server is port 1433 and both the SQL Server and Globomantics.IdentityServer are running inside compose. The Globomantics.Core project was NOT added to the docker compose file, and so for it to access the data, it uses a servername of localhost,1435 in its connection string.
Lots of notes regarding nginx, SSL, and other aspects are all included in the readme of the repo.
SQL Server in Docker and Timing
One interesting (and challenging) aspect of using an existing user database within the docker-compose environment was figuring out a way to have the database set up when the application starts. Here are the key points that led to success:
- Wait for SQL Server to be started. This varied from 15-50 seconds, and I didn’t want to just say “wait for 60 seconds” to cover my bases — I wanted to wait until it was running. This is achieved by the wait-for-it.sh script, and it uses
globsql:1433as its input. - Then wait 2 more seconds. If you simply try to log in to SQL as soon as port 1433 responds (which is what the
wait-for-it.shscript does in our example) the login generally fails. By waiting an additional 2 seconds after 1433 responds, the login works. - THEN run whatever SQL you need. This is all in the
InitializeGlobomanticsDbAndUser.sqlfile. Modify this however you like.
Overall, moving authentication out of individual applications and into a centralized service is a great enabling tool to have at your disposal. You now are ready to add support for SPAs, mobile apps, and whatever else you might need.
Code on! 🙂