Authoring Short, Targeted Videos
Creating a short video that addresses a single topic can be a very useful skill to have. I learned it (and still have more to learn) from both working on Pluralsight courses and creating short videos to help my teammates at RealPage. Beyond that, the following process can be applied to larger topics to create full “courses” like the ones I’ve done on Pluralsight.
You might think of a video as simply “walk through a simple thing and talk about what you’re doing while you’re doing it” — and while that’s what the video ends up looking like, that’s often not the way it was created. A real workflow (at least for me and many other authors I know) is involved, and an often-shared ratio is that for every one minute of finished video it takes about 45 minutes of effort to produce that finished minute.
So why bother if it takes so much effort to create a video? The answer for me is simple: The time spent is an investment in the watcher(s) — it will be a pleasant experience for them to watch, and easy to re-watch if they need a refresher.
My setup and workflow is what I’ll describe in this post, and this workflow would work for you regardless of whether you are awesome at doing and talking at the same time or not (I’m not).
Basic workflow
- 0: Setup Requirements – have some video and audio capture and editing software and some kind of microphone or headset
- 1: Plan your content – have some simple notes about what you intend to show
- 2: Record video / screen activity – be very deliberate in movement
- 3: Script audio: write a voice over for the video you’ve recorded in spoken English
- 4: Record audio: read your script on its own and record yourself – just keep going and repeat any missteps
- 5: Edit the audio: focus on pace and clarity as well as eliminating distractions
- 6: Combine video with polished audio: extend/cut/speed up video as needed to match clean flow of audio
- 7: Add annotations / callouts/ highlights / text boxes: call out important parts of video and make transitions pleasant
- 8: Publish!
0: Setup Requirements
Before you can even start, you need a way to capture audio and video. I am using Camtasia for doing both of these and have loved the experience. You can get a free trial of it, but it’s not a free product and as I write this costs $250 USD. This is not cheap but again is an investment in both your skills as a communicator / content producer, and the people who will end up watching your videos.
You’ll also need a microphone to speak into. This could be something as simple as a headset or a more elaborate setup. I started out with a headset and then “graduated” into something more sophisticated. If you want to read about my journey, see my post about Upping Your Audio Game.
If your audio capture can produce mp3 files, and your video editor supports multiple “tracks” and can cut, extend, and speed up video, as well as add "callouts" – like text bubbles, drawings, or shapes, and can also do transitions between two videos, that should be all you need.
1: Plan Content
This is where you figure out exactly what you need to screen-record. Make sure you have a concise topic defined — don’t try to create a long video that covers everything about a general topic. Pick a more concise topic and then figure out exactly the flow you want. Getting some notes down in a simple text file (or whatever works) is very helpful.
As an example, let’s say that I wanted to create a small video about how to add Docker support to a .NET project in Visual Studio — that’s a nice, tight topic but will still has some different points of interest in it. Here are the notes that I created for this video:
 1- new API project (no docker support)
 2- Look briefly
 3- put a breakpoint in controller
 4- run it / hit breakpoint
 5- Add Docker Support
 6- look at docker file
 7- verify run profile
 8- launchsettings.json
 9- run / hit breakpoint
10- container tools window
Those notes are going to help me when I record the video to know exactly what I should do. Those are all of the things I’ll want to show and talk about. One key point here with your notes and content is to really make sure you content stays focused on the topic at hand. You may be tempted to add more – but that should only be done if it is relevant to the topic at hand and the viewer will be better off for seeing the additional content. Often times this is NOT the case and you’ll want to omit much of what you might have been tempted to add — keep the topic simple and ON POINT.
2: Record video / screen activity
Before you start, set your resolution to no greater than 1920×1080. If you have a great big monitor or can do 4k, that’s great – but many viewers will not have that same setup. Recording at a lower (but still good) resolution can enable those viewers to have a better experience watching your content.
Also, make sure your font is a reasonable size and “theme” settings have a decent contrast to them. Dark theme or light theme doesn’t matter – just ensure good contrast and a big enough font to be very easily seen by eyes other than your own.
Here are some tips for you when you are doing the recording:
- Move the mouse as little as possible
- Never use the mouse to point at something you want to show (callouts will do that later)
- Don’t be afraid to make your mouse cursor size bigger to make it more visible
- Be careful not to let text go off the screen if you adjusted your monitor resolution
- Don’t worry about being “fast enough” or “slow enough” – speed can be adjusted in videos
- If you don’t like the way something you just did “flowed” — just keep going and REDO it — you can always cut out the first pass during editing
- You don’t HAVE to have the viewer watch you type – you can paste in snippets or just point out already-completed things — just give enough time at each point you want to make – and keep in mind that video frames can be extended during editing
3: Script the audio
Once you’ve got a video recording done, write a narration script to go along with it. Make sure to write using "spoken English" — it’s not a research paper you’re writing but a story that you’re telling about the video you created.
By way of example, “Here we are in Visual Studio and now we’re gonna containerize this .NET app we’ve been working on.” This statement is perfectly fine to get our video started – but it uses “gonna” and ends with a preposition which you’d get ding’ed for if this was a paper of some sort. Keep in mind that you’re talking to the viewer.
Keep jokes and tangents to a minimum. That doesn’t mean you can’t have fun with it, but keep in mind that you’re specifically trying to communicate a specific topic and viewers may want to watch more than once. The more you stick to the topic at hand the more likely they can effectively view and come back to this content.
And don’t write to include any mistakes you made during the video recording (unless you’re trying to illustrate those to help the viewer better understand topic — which can be very useful for common errors that they might encounter). Write a clear monologue that covers the topic – and don’t be afraid to interject with exclamations – like “that was great!” or things like that. Also – don’t be afraid to pose a question — “You may be thinking to yourself – but how do I….” or “i’ll be you’re wondering why… — i know I sure was”. These techniques can bring the viewer right into the place where they can better identify with the topic.
4: Record the audio
Here are some general tips to follow when you’re recording audio:
- If you mis-speak, pause your narration (not the recording), take a breath, and do it again — repeat until you’re happy with what you’ve just said. Remember that you can always cut bad stuff out of the recording during editing.
- Use a good level of energy / show an interest in the topic
- Stand up if possible
- Have a glass of water handy
- Don’t worry about long pauses – they can be edited out
5: Edit the audio
Using your editing software (again, I’m using Camtasia), now’s the time to edit the audio. This is a process that requires patience and takes some time. A rough estimate for timing is that it will take you 6 minutes per original minute of audio, and you will end up trimming about 25% of it. It took me 24 minutes to edit 4 minutes of original audio and the result was 3 minutes of “polished audio.” Goal: Create audio that flows nicely and doesn’t have distracting sounds.
There is probably an option to "mix to mono" – you don’t have a stereo narration, so likely a mono-based output is what you need.
You can even listen with your eyes closed — make sure the cadence is right and the dialog “feels natural”. Any pause longer than 1 second I generally consider too long (typical are more like 0.5 – 0.75 seconds for a pause).
The whole point here is a good listening experience for the viewer – so remove distracting breathing sounds — you can do this by lowering their volume level during the bad sounds.
You can also re-record audio that you don’t like – just the small bit that you don’t like. By adding a new clip of audio to your timeline just use cut/paste/insert to put the revised audio where the undesirable one was.
6: Combine video with polished audio
You’ll have two "tracks" in your video editor – one for the video, and one for the audio. Set both of their starting points at the same sport, and start editing.
- Make a least one second of "no audio" at beginning and end of video
- Use these key editing features:
- Cut: remove video you don’t need
- Split: create a split point to move some video to start at a later point
- Extend: Extend a single frame if you’re talking about it for longer than the video shows
- Clip Speed: Speed up (or slow down, but most often it’s speed up) a segment of the video so that viewers aren’t watching you type long things or waiting for things to launch / happen
- Fade transition: If you change from one view to another abruptly, just add a fade transition and it will appear very natural
To learn how to use Camtasia, check out the Pluralsight course Camtasia: Getting Started.
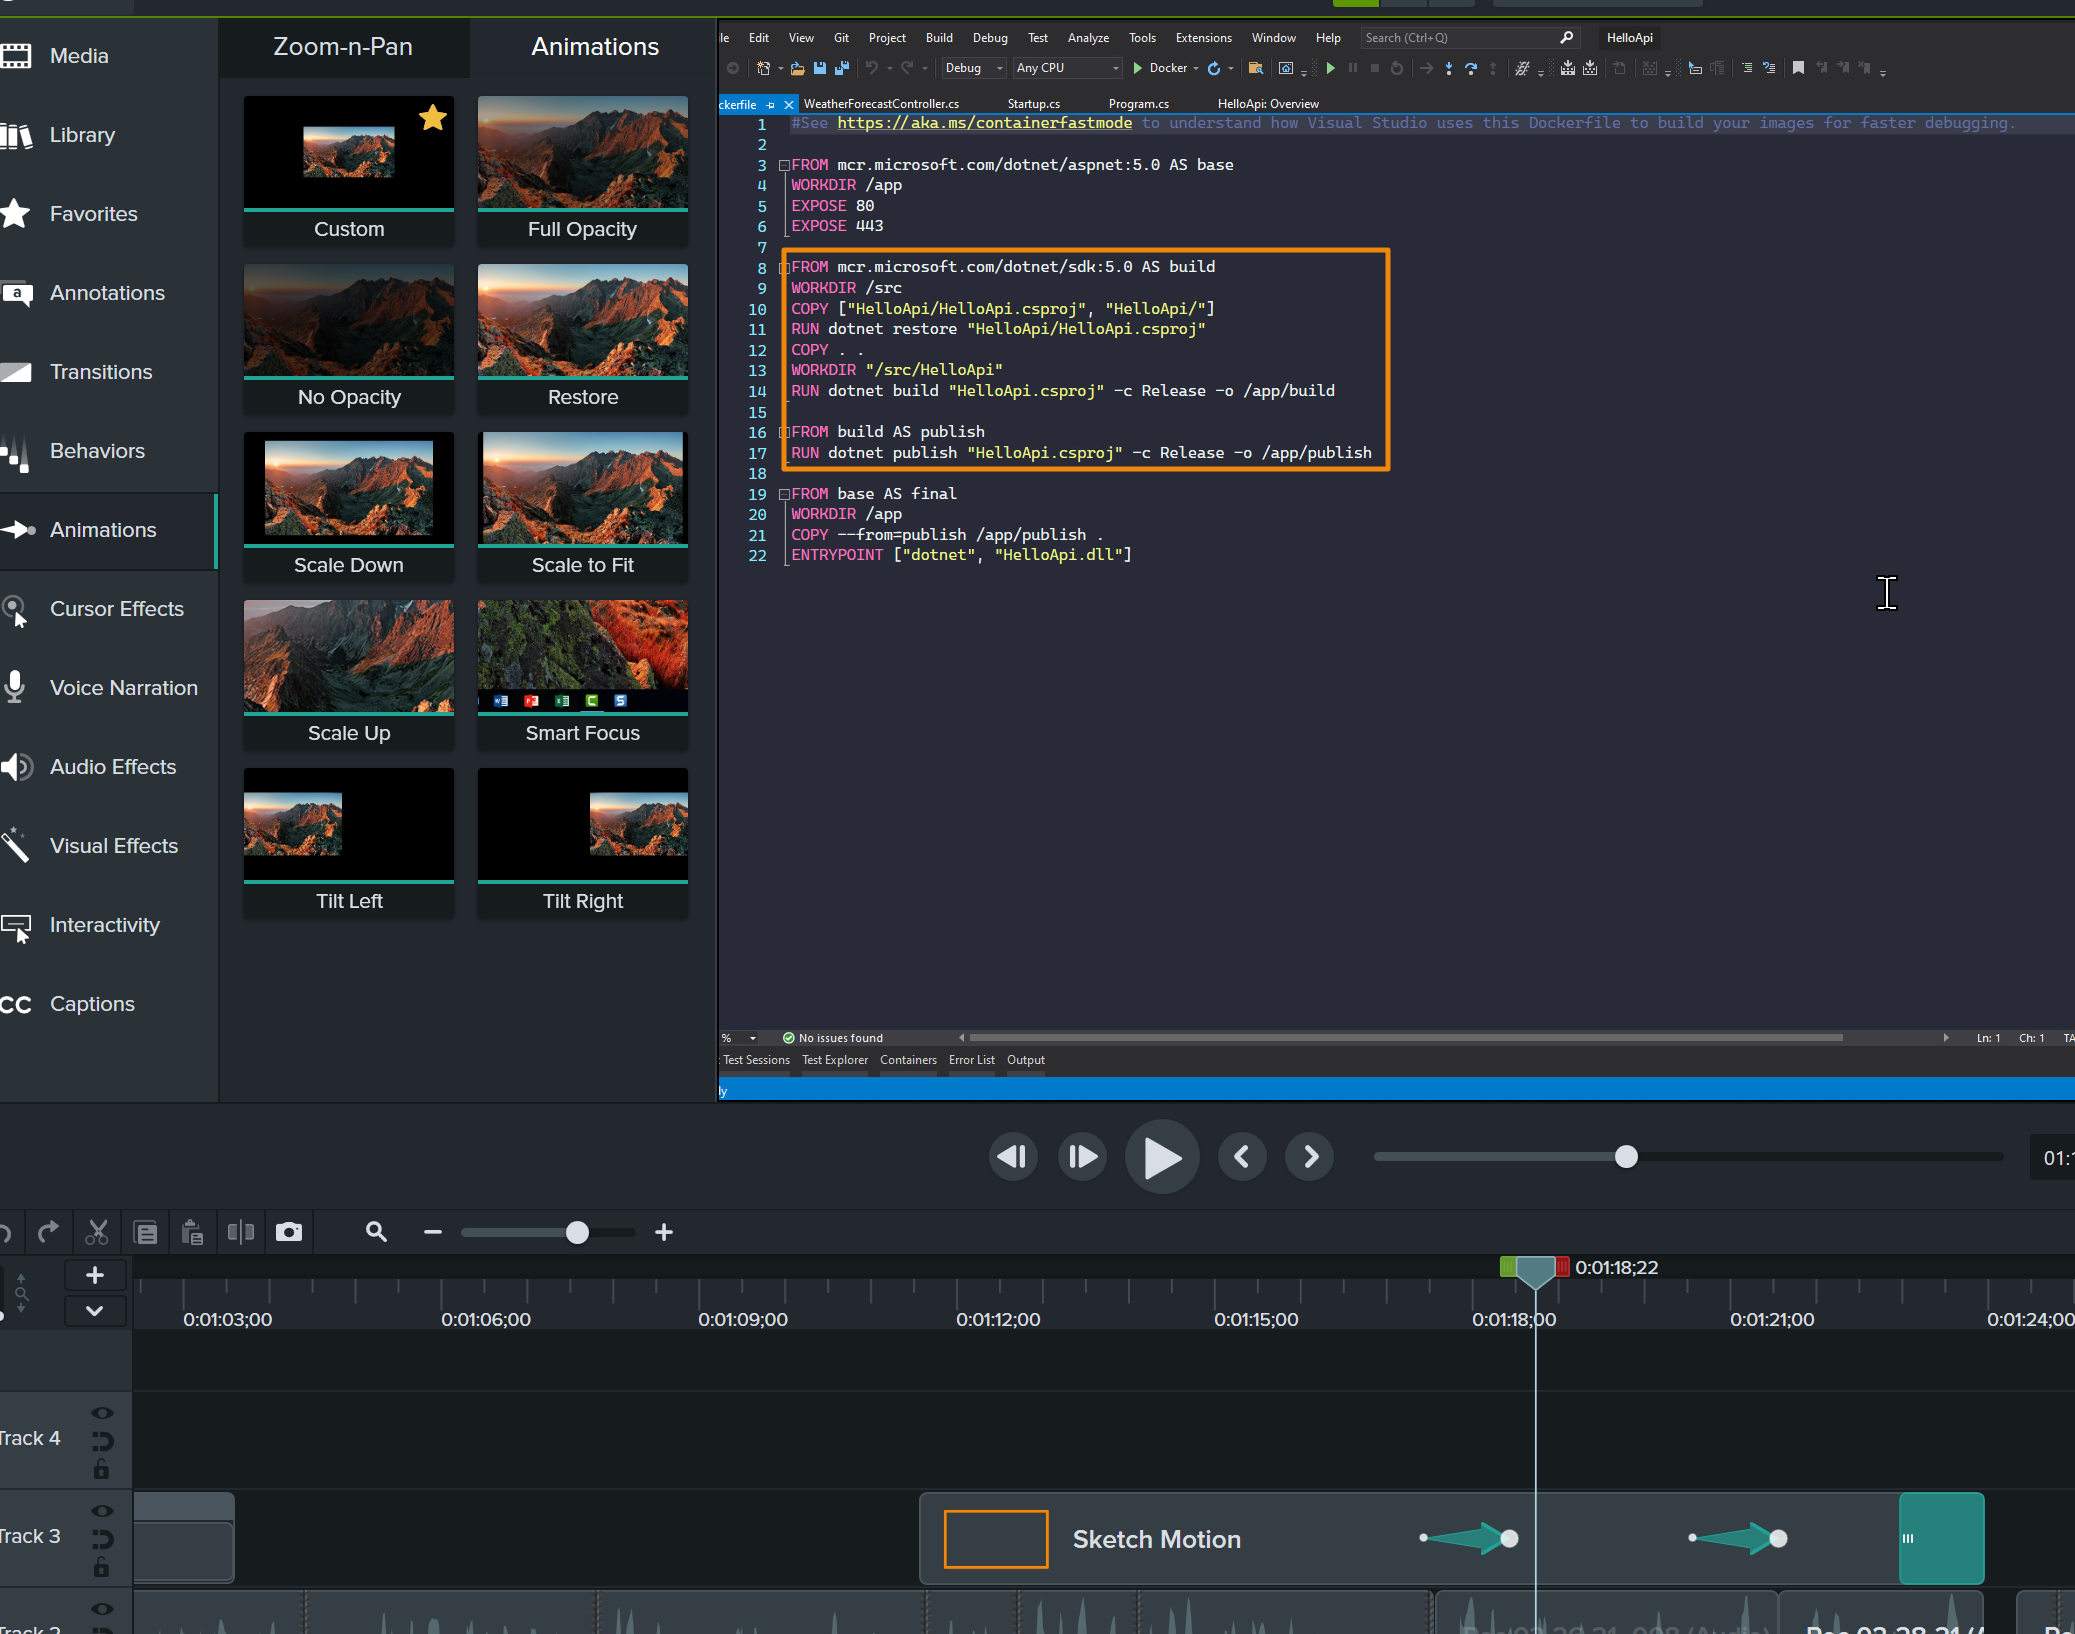
7: Add annotations / highlights / callouts / text boxes
Once you’ve got a great video with matching audio finalized, it’s time to put the finishing touches on your video to give it that extra “pop” that will provide focus areas for your viewers.
Camtasia has a bunch of these, and here’s a summary of the key ones I use in videos I create (for Pluralsight or otherwise):
Sketch Motion -> Box or Arrow – and Custom Animation!
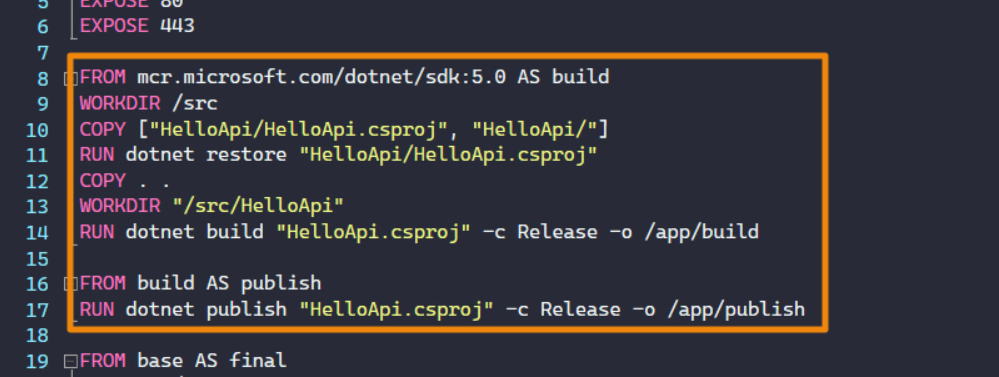
This is probably the most important set of annotations and techniques. Use a box or drawn arrow to point out specific things you want to call to the viewers attention — this is better than wiggling your mouse and less distracting. 🙂
Regarding the choice of color for these things, just pick something that contrasts nicely with video content itself.
Here’s an arrow:
![]()
Here's a box:
And if you are pointing out one thing, then another ON THE SAME SCREEN, you can use a “Custom Animation” on your box or arrow to simply move the element and/or change its shape – you drag the custom animation onto the element that will change shape, position, and then BEFORE the arrow is the initial state, and AFTER the arrow is the new one, and during the arrow it figures out how to get from A to B:
Callout
This is a text box of some sort — maybe you want to mention something that you didn’t end up saying in audio and it’s good to know but not important enough to go back and record new / additional audio. I would recommend putting a Fade transition on the callout at the front and end to have it come in and leave in a nice way. Here’s a sample callout (large one) that I used as a title for a short video I did on effective posts within MS Teams:
Blur
You can use a blur if you want to hide some content on a screen you’ve recorded.
Highlight
A highlight is like a yellow (or other color) highlighter that is useful for highlighting text on a web page, for example. Often times the “Box” above is just as good if not better, but this can come in handy too from time to time.
8: Publish your video
This is the easiest and most satisfying step in the process. You simply export your video into a publication format (mp4 is common) and then share it in whatever channel you want! YouTube, Microsoft Stream, Vimeo, etc.
Happy publishing!!