Journey to Connect-4 on Rasberry Pi 2 With Pi Sense Hat
Introduction This article dives off in another direction from standard .Net stuff and moves into the realm of Makers. I’ve been participating in my son’s school Thursday afternoon Makers Club with them with a Raspberry Pi 2 (note: the new Raspberry Pi 3 would likely also work just fine for this stuff) and a Pi Sense HAT — it’s been SOOO much fun figuring out how to blink LED’s and write some simple programs to leverage the capabilities of the Sense HAT. Our latest project has been to create a version of Connect-4 using the joystick and the 8×8 LED matrix on the Sense HAT. That effort is what I’ll be writing about in this post.
If you’re interested in getting started I’ll include some links at the bottom of the page for the products that would get you going (there are really only two) and some notes. All of the equipment costs less than $150, and you’re only scratching the surface of what can be done with only these items. I’m a huge fan.
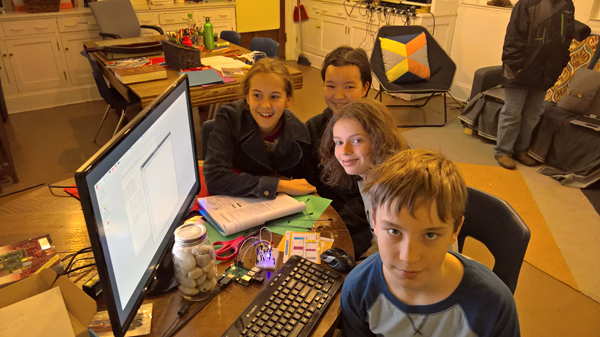
Here’s a picture of some of the gang when we were doing some LED work:
All of the code for this program, including the “getting started” logic, is located on my GitHub repository.
If you have questions about how to get at the samples, download code, or get a Pi set up initially, I can help — but I’m consciously not including every detail in this post. Just ask questions in the comments.
Some background
The Makers Club at the Prairie School of DuPage has between 5 and 10 kids that have gotten involved in this project in one way or another — all between 9 and 15. We got started with the Sense HAT simply by exploring it sample programs and looking at the API documentation available for it.
Of particular note were the following samples and API methods:
text_scroll.pyThis is a simple example of using the API method “show_message” to scroll some text across the LED matrix. You can have some fun with this by exploring / changing the “scroll speed” value and even the text and background color values.pygame_joystick.pyThis is a simple example that shows the code to detect joystick directional movements (left, right, up, down, and enter (pushing the joystick in like a button)). The example reads an action and then lights up individual LEDs in the matrix by using the “set_pixel” API method.
After looking at these samples and a couple of others (including exploring the Rock-Paper-Lizard-Spock code for the Sense HAT), we thought that it would be fun to try to create Connect-4 using the individual LEDs on the matrix as the chip spots. So we got started!
Getting started
To get started, we wanted to create a way to “get a move”. The basic logic would be this:
- Light up the top left chip with a color (red)
- Read only left, right, and enter moves from joystick until we get an enter move. Up and down are ignored (make sure to not allow moves off the grid).
- When enter is pressed (push in on the joystick), that is the move the player will want to make, so “drop” the chip in that column.
So given the above logic, we needed to write some code — one function to get a move, and another to drop a chip. Note that the code we are about to write doesn’t really keep track of anything relative to the entire “board” beyond getting a move that is limited to the 8 columns. We are not storing where chips have been placed, let alone checking to see if anyone won the game. That will come later. We are simply getting started by creating the building blocks that will be used in the game.
Shown below is the getMove code — simplified from final version for reasons I’ll explain later:
 1def getMove(p) :
 2    currentColumn = 0
 3    sense.set_pixel(currentColumn,0, p[0], p[1], p[2])
 4
 5    running = True
 6    while running:
 7        for event in pygame.event.get():
 8            if event.type == KEYDOWN:
 9                if event.key == pygame.K_RIGHT:
10                    if currentColumn < 7:
11                        sense.set_pixel(currentColumn, 0, 0,0,0) ## turn off LED where chip was
12                        currentColumn += 1
13                        sense.set_pixel(currentColumn, 0, p[0], p[1], p[2])  ## light up new spot where chip is with color of player (p)
14                if event.key == pygame.K_LEFT:
15                    if currentColumn > 0:
16                        sense.set_pixel(currentColumn, 0, 0,0,0)  ## turn off LED where chip was
17                        currentColumn -= 1
18                        sense.set_pixel(currentColumn, 0, p[0], p[1], p[2]) ## light up new spot where chip is with color of player (p)
19                if event.key == pygame.K_RETURN:
20                        running = False
21                        return currentColumn
The code above is basically an infinite loop that reads moves until the player pushes the joystick in, thereby selected the column into which they will drop a chip. Note — the input parameter p is for "player" which we defined as a color — either red or blue using RGB (red-green-blue) notation. So something like the snippet below works great.
 1RED = [255,0,0]
 2BLUE = [0,0,255]
 3var player = RED
 4while True:
 5    var selectedColumn = getMove(player)
 6    dropChip(selectedColumn, player)
 7    if (player == RED):
 8        player= BLUE
 9    else:
10        player = RED
The next code snippet shows the dropChip code, which simply drops a chip down the selected column by turning LEDs on and off and waiting for a short time between LEDs.
1def dropChip(col, p):
2    var i=0
3
4    while i <= 7:
5        sense.set_pixel(col, i, 0,0,0) ## turn off row where chip was last seen in the drop
6        i += 1
7        sense.set_pixel(col, i, p[0], p[1], p[2])  ## light up next row with player color
8        time.sleep(0.1)  ## give it some time to actually look like it's falling
At this point, you should have a runnable program that will just loop from one player to the next getting moves and dropping chips all the way to the bottom of the board. Try it out! 🙂
Building the Game
Define the board
To get started with an actual game of Connect-4, we need to have a way to keep track of the “board” that chips get dropped into — noting which color has been dropped into each individual spot on the board, or if the spot is still empty. I chose to just create a two-dimensional array as shown here:
 1#each array is a column with 8 row values --- 8 columns total
 2board = [
 3          [ '', '', '', '', '', '', '', ''],
 4          [ '', '', '', '', '', '', '', ''],
 5          [ '', '', '', '', '', '', '', ''],
 6          [ '', '', '', '', '', '', '', ''],
 7          [ '', '', '', '', '', '', '', ''],
 8          [ '', '', '', '', '', '', '', ''],
 9          [ '', '', '', '', '', '', '', ''],
10          [ '', '', '', '', '', '', '', '']
11]
So each empty (unoccupied) spot is just an empty string, and as players claim spots we will update the value to be either RED or BLUE (our RGB notation values noted above).
Keeping track of the board
Given the above representation of the board, we need to update the logic for “dropChip” to stop before it finds an unoccupied spot, and to update where it stopped with the appropriate color on our board as well as the LED matrix. The new code for dropChip looks is shown below. We return the row that the chip ended up in to facilitate checking for a win, explained below.
 1##------------------------------------------------------
 2### dropChip takes a player (color) and column and
 3###   "drops" the color as far as it can go and updates
 4###   the board, returning the y position of the drop
 5###------------------------------------------------------
 6def dropChip(col, p):
 7    global board
 8    row=0
 9
10    while board[col][row] == '':
11        if row == 7 or board[col][row+1] != '':
12            board[col][row] = p
13            return row
14
15        sense.set_pixel(col, row, 0,0,0)
16        row += 1
17        sense.set_pixel(col, row, p[0], p[1], p[2])
18        time.sleep(0.1)
Basic overall logic for the game
Get the kids to describe the overall flow of the game before getting too deeply in the details. A snippet above had a start of the logic:
- Get a move from player
- Drop chip into selected column
- Switch players
You can do the above infinitely, but you will run out of board spaces and you haven’t included win checking. So basically the only change is to check for a win after dropping the chip, and announce a winner and quit if you found a win. If you didn’t, check to make sure the board isn’t full. If it is, announce a tie and quit. If it isn’t, then switch players and repeat.
Checking for a win
This is one of the great learning opportunities of this project — I’ll describe more later, but what it comes down to is getting the kids to describe precisely how they know if someone has won the game when a chip is dropped. Once you agree on how to logically check (there is a right answer here), then you need to turn that into code (there are lots of ways to do this).
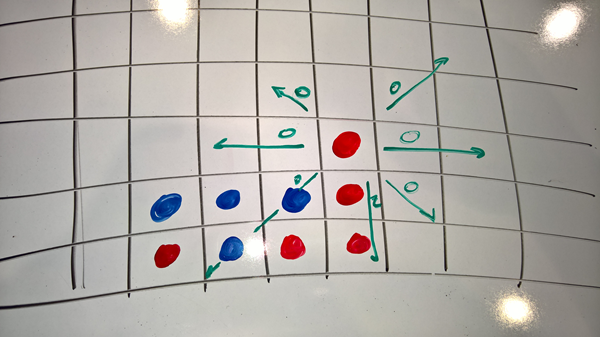
There are four ways to win: horizontally, vertically, top-left to bottom-right, and top-right to bottom-left. You need to check each of these directions for continuous values of the dropped chip color. Not much ambiguity here — this is what you need to do. The question THEN becomes how you code the logic, and we came up with a solution that works (there are certainly others).
Our coded logic is like this (starting with a horizontal check):
- Start from the column and row of the dropped chip
- Count how many adjacent chips to the LEFT of the dropped location match the chip color
- Count how many adjacent chips to the RIGHT of the dropped location match the chip color
- Add 1 (for the dropped chip) and the left count and the right count together
- If the result is 4 or more then you have a win!
What we discovered is that for the other checks, if we just did the same thing but also allowed for up/down checking instead of just left / right, we could use a single function for all of the checking and just call it with different “change in up/down” and “change in left/right” values. So our win checking code is two functions — checkForWin which contains the logic for the four ways to win, and the countAdjacent method which counts how many chips are the same as the dropped chip in the direction specified by the parameters.
The logic is shown by the diagram below. Note that We don’t need to check UP from the dropped chip for the vertical win — we already know there is nothing above it. We count in each direction FROM THE DROPPED chip to see whether there is a win.
Here's the code:
 1###------------------------------------------------------
 2### checkWin does what it sounds like
 3###------------------------------------------------------
 4def checkWin(p, c, r):
 5    global board
 6    ### check horizontal
 7    leftCount = countAdjacent(p, c, r, 0, -1)
 8    rightCount = countAdjacent(p, c, r, 0, 1)
 9    totalCount = 1 + leftCount + rightCount
10
11    if totalCount >= 4:
12        return True
13
14    ### check top left to bottom right
15    leftCount = countAdjacent(p, c, r, -1, -1)
16    rightCount = countAdjacent(p, c, r, 1, 1)
17    totalCount = 1 + leftCount + rightCount
18
19    if totalCount >= 4:
20        return True
21
22    ### check for bottom left to top right
23    leftCount = countAdjacent(p, c, r, 1, -1)
24    rightCount = countAdjacent(p, c, r, -1, 1)
25    totalCount = 1 + leftCount + rightCount
26
27    if totalCount >= 4:
28        return True
29
30    ### check verticle
31    downCount = countAdjacent(p, c, r, 1, 0)
32    totalCount = 1 + downCount
33
34    if totalCount >= 4:
35        return True
36
37    return False
38
39###------------------------------------------------------
40### countAdjacent takes a column change (yChange)
41###   and rowChange (xChange) and returns the number
42###   of adjacent chips in that direction from the original spot
43###------------------------------------------------------
44def countAdjacent(p, c, r, yChange, xChange):
45    global board
46    adjacentCount = 0
47    while True :
48        c = c + xChange
49        if c < 0 or c > 7:
50            return adjacentCount
51
52        r = r + yChange
53        if r < 0 or r > 7:
54            return adjacentCount
55
56        if board[r] == p:
57            adjacentCount = adjacentCount + 1
58        else:
59            return adjacentCount
Learning moments for the kids
Overall, this project is an excellent learning experience for kids. Here are some notes.
- Writing code based on examples and API documentation: The “Getting Started” code above is really just taking the examples that were included with the Sense HAT and customizing them based on some new “requirements.” The code is not much of a stretch beyond the examples themselves, but you are forced to think about exactly what you want to do (and not do – in the case of ignoring up / down movements on the joystick) as well as understand the input parameters to the methods (to display different colors for the different players).
- Understanding how to represent a board in code: Creating the “board” — and coming up with how to represent it — may not be something that the kids can do, but given an approach (I personally defined the 8×8 two-dimensional array and described it to them), they figured out how to use that, and I think they could have the same kinds of ideas in the future (chess or checkers, anyone??). Then they had to figure out how to “move around” in that by changing row or column values as they checked for wins and dropped chips.
- Getting them to put logical words to thoughts: The kids all knew how to play Connect-4. But getting them to tell me how they would check for a win forced them to stop and think about things quite a bit. They could check immediately, but getting them to describe what they were thinking when checking was a great exercise.
- Win checking is closely tied to Cartesian coordinate system: If kids have been exposed to the grid layout of Cartesian coordinate systems, talking about things like x-y coordinate or “change in x” or “change in y” reinforce what they are learning in those places and emphasize its importance in life beyond just graphing homework and slope equations.
- Structuring code: One of the things I talked about with the kids was the need to try and keep code readable, and to use different functions for things whenever possible. To name functions well and keep them more singularly-purposed (e.g. dropChip, checkForWin, etc), makes it easier to understand what the code is doing and then to make changes later.
Code notes
A couple of brief notes here about the code itself. First, the “CheckForTie” logic is incomplete — it would be easy enough to build and I will likely post an update to GitHub with the completed logic for tie checking.
The big difference between the code shown above for the getMove function and the one on GitHub is that since the top row is “in play” and also what we use to move the chip for when the player chooses a column in which to place their chip, it becomes important to not let them navigate into a fully-occupied column.
Taking it further / next steps
Here are some ideas for how the code could be expanded upon from where it already is. Just in case you’re looking for more ideas. 🙂
- Complete the tie-checking logic Animate a win somehow. Ideas include flashing the whole board, flashing the winning chips, displaying a picture, animating a firework, or slowly wiping out the board. I’m sure you can come up with others.
- Let the computer play blue to support a one-player game against the computer. Thoughts on this:
- Start by just having computer pick a random available column to drop a chip
- Then improve by looking to achieve a win for self, or block a win for player, and random spot after that
- Then go crazy by scoring available open columns and picking best one
I’m sure you can come up with other ideas — happy exploring!
Links to the products used (roughly $140 total as of my writing)
- Raspberry Pi 2 (Kit) I started out by getting a full kit (a good call if you haven’t done this before) from Amazon. The kit provides a pre-loaded Micro-SD card and instructions on getting your Raspberry Pi up and running.
- Raspberry Pi 3 (Kit) This is a newer version of the Raspberry Pi 2 and is faster and includes Bluetooth. This would work equally well, and if I was starting from scratch I would choose this one — but you definitely don’t need both a 2 and a 3!!
- Pi Sense HAT This is the Sense HAT with the 8×8 LED matrix and a joystick — as well as a lot of other sensors that I didn’t even describe in this post!!
Here’s a link that you will likely find helpful regarding getting started with the Sense HAT as well: https://www.raspberrypi.org/learning/getting-started-with-the-sense-hat/worksheet/