A Great Prompt Experience
Overview
Creating great prompt experience for yourself - one that works for YOU - can help with productivity. I've spent some time setting one up for me, and some people have asked me about it. If these things work for you, great and feel free to use the setup as-is. But I definitely encourage you to make sure that whatever setup you use works for you.
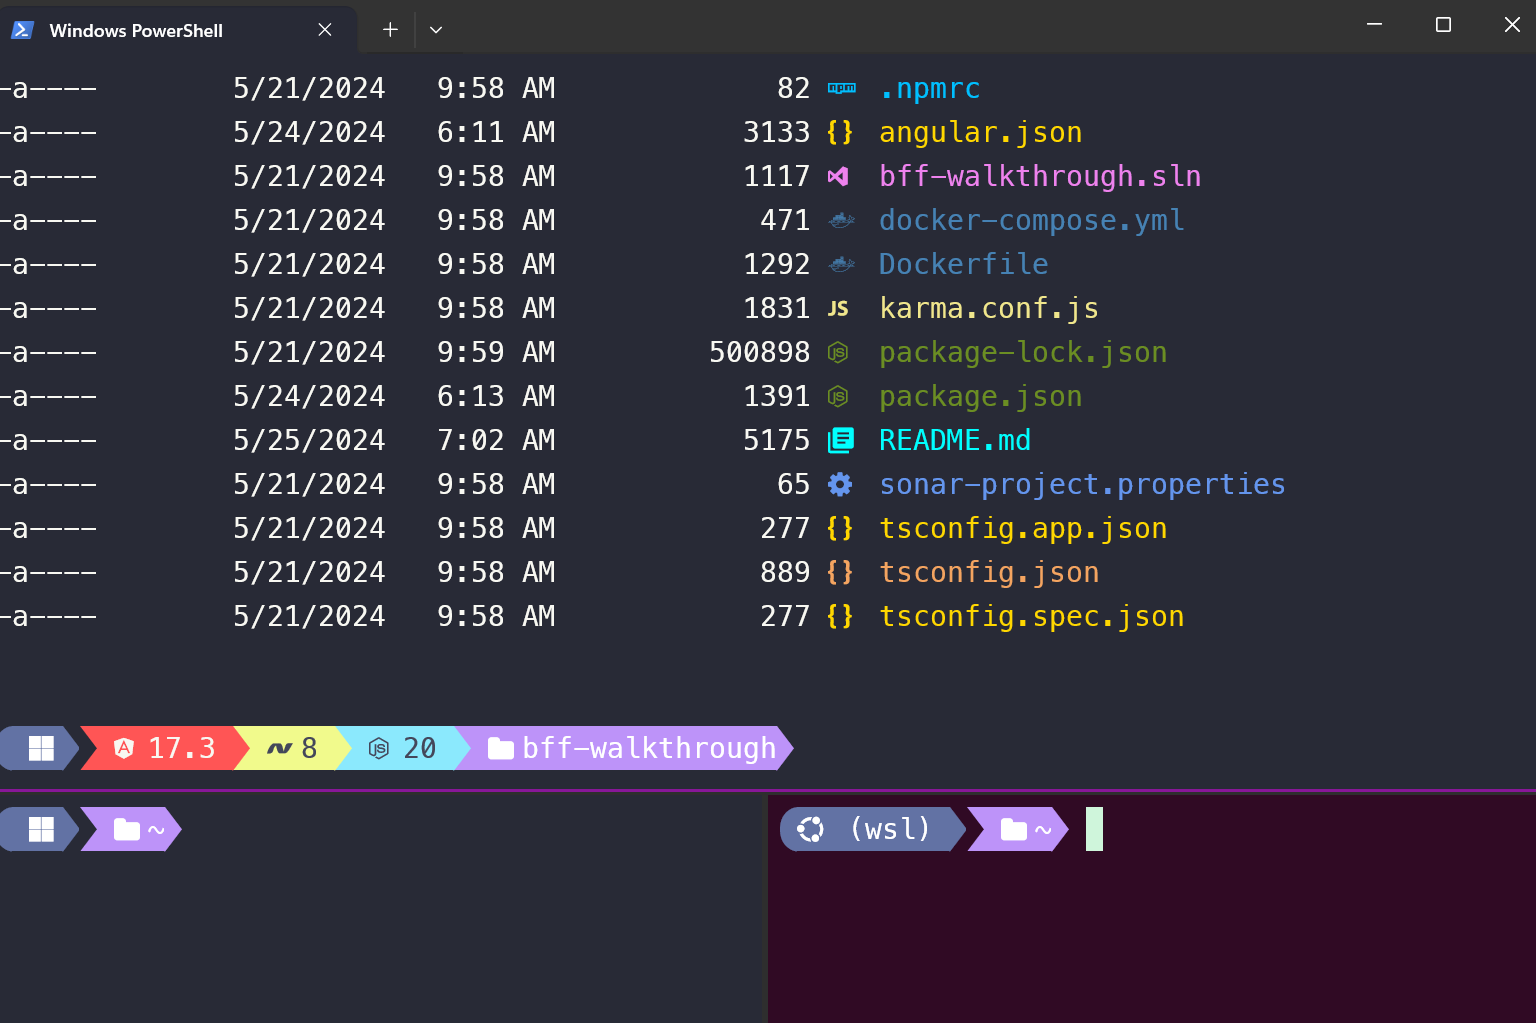
Here's a screenshot of mine (I just a dir in the top pane):
Windows - Use Windows Terminal
If you're on Windows (I am), I recommend using Windows Terminal for all your terminal needs (versus Command Prompt). Lots of features and enhancements are available there that aren't in the Command Prompt.
If you don't already have it, you can install it from the Windows Store, or use a package installer:
1winget install Microsoft.WindowsTerminal
Once it's installed, make sure it's your default terminal application -
you can access settings with Ctrl+, - and there is an option for
**Default terminal application" that you can set to Windows Terminal.
Install Oh-My-Posh
The link above is for Windows machines, but there is a corresponding link for MacOS, too.
Once you've done this (you may need to relaunch your terminal window
for PATH changes to have been updated), install a Nerd Font.
The easiest way is:
1oh-my-posh font install --user
The best / easiest font to use here is probably the Meslo one -- feel free to
choose a different one but be aware that some special characters / icons may
be different for you.
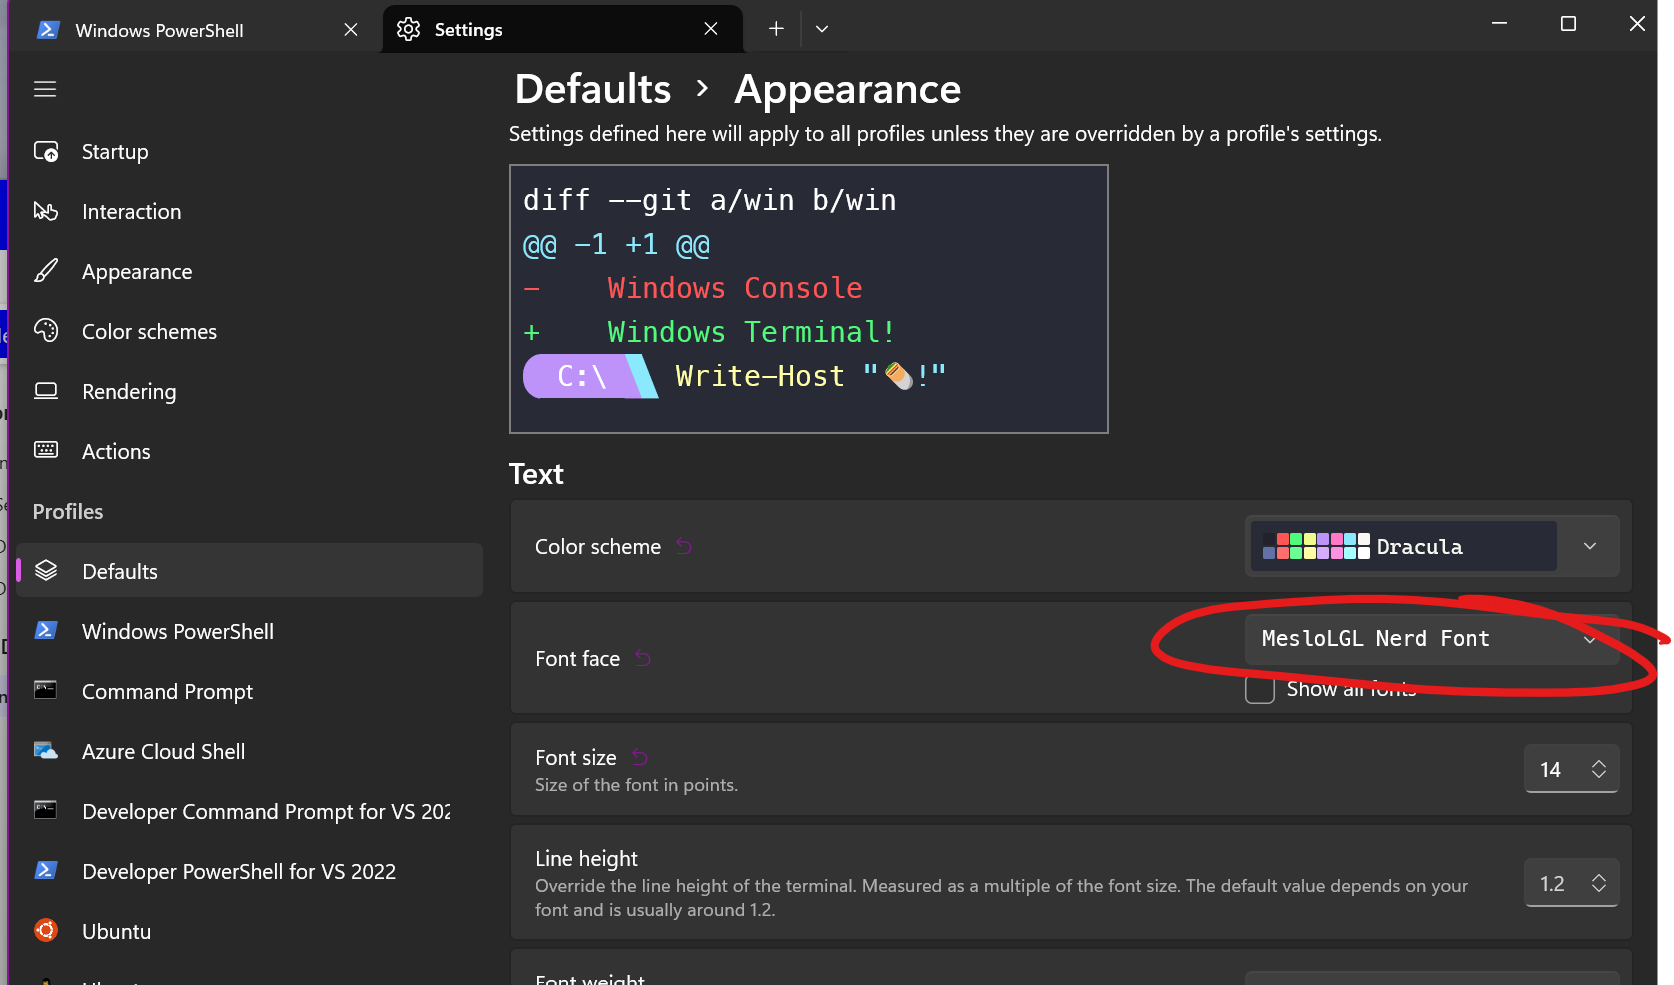
Once you've installed the font, you should configure the terminal to
use that font as your default. That setting can be found in the
Profiles->Defaults section under Appearance as shown below:
You also need to enable Oh-My-Posh in your powershell profile.
If you type notepad $profile in a prompt you can add this line
to the file:
1oh-my-posh init pwsh | Invoke-Expression
The following command will create a powershell profile if one doesn't already exist:
1if (!(Test-Path -Path $profile)) { New-Item -ItemType File -Path $profile -Force }
There are additional notes in the official docs, but you need to reload your profile for the new shell settings to take effect.
Either restart the terminal, or type . $profile in the prompt which should
also reload it. You can also open a new tab / window to do the same.
At this point you should already have a better looking prompt / terminal that can be further configured to your needs!
Choose a Theme
There may be a theme available that suits your needs -- or one that you like how it looks.
If you see one in the above link you just need to modify the
oh-my-posh init line in your $profile to include some config:
1oh-my-posh init pwsh --config 'C:/Users/Posh/jandedobbeleer.omp.json' | Invoke-Expression
The only new content in the above line is (replace jandedobbeleer with the theme
you want to use):
1--config 'C:/Users/Posh/jandedobbeleer.omp.json'
Customize Your "Segments"
Segments are a block of content that can be included in your prompt -- and there are a lot of options.
Using segments means adding a block of json to your config for Oh My Posh. If you
have a theme that you're already using, make a copy of it and give it a new name.
Then just add the segments you want! I've got an example of my custom theme at the bottom of this section.

The segments that I've got included are:
- Angular - shows the Angular version when you're in a folder with an Angular project
- Node - shows the current Node version when you're in a folder with a
package.jsonfile - .NET - shows the .NET version in a folder with a .NET project or solution
- Git - Shows current branch and change count
- Path - Shows current directory (folder name OR full path)
The point with these segments is that they can give you some visibility into things that matter to you - in my case I care about version numbers to make sure that I don't fall too far behind on things.
One thing to note is that the segments generally show up when they make sense.
Other segments that may be of interest to you:
Here's my custom theme:
1{
2 "$schema": "https://raw.githubusercontent.com/JanDeDobbeleer/oh-my-posh/main/themes/schema.json",
3 "blocks": [
4 {
5 "alignment": "left",
6 "segments": [
7 {
8 "background": "#6272a4",
9 "foreground": "#ffffff",
10 "leading_diamond": "\ue0b6",
11 "trailing_diamond": "\ue0b0",
12 "style": "diamond",
13 "type": "os"
14 },
15 {
16 "type": "angular",
17 "style": "powerline",
18 "powerline_symbol": "",
19 "foreground": "#F8F8F2",
20 "background": "#FF5555",
21 "template": " {{ .Major}}.{{ .Minor }} "
22 },
23 {
24 "type": "dotnet",
25 "style": "powerline",
26 "powerline_symbol": "",
27 "foreground": "#44475A",
28 "background": "#F1FA8C",
29 "template": " {{ .Major }} "
30 },
31 {
32 "type": "node",
33 "style": "powerline",
34 "powerline_symbol": "",
35 "foreground": "#44475A",
36 "background": "#8BE9FD",
37 "template": " {{ .Major }} "
38 },
39 {
40 "background": "#bd93f9",
41 "foreground": "#ffffff",
42 "powerline_symbol": "\ue0b0",
43 "style": "powerline",
44 "properties": {
45 "style": "folder"
46 },
47 "template": " \uF07B {{ .Path }}",
48 "type": "path"
49 },
50 {
51 "background": "#ffb86c",
52 "foreground": "#ffffff",
53 "powerline_symbol": "\ue0b0",
54 "properties": {
55 "branch_icon": "",
56 "fetch_stash_count": true,
57 "fetch_status": false,
58 "fetch_upstream_icon": true
59 },
60 "style": "powerline",
61 "template": " \u279c ({{ .UpstreamIcon }}{{ .HEAD }}{{ if gt .StashCount 0 }} \uf692 {{ .StashCount }}{{ end }}) ",
62 "type": "git"
63 }//,
64 //{
65 // "background": "#ff79c6",
66 // "foreground": "#ffffff",
67 // "powerline_symbol": "\ue0b0",
68 // "style": "powerline",
69 // "type": "kubectl",
70 // "properties": {
71 // "prefix": " \uF1D1 "
72 // },
73 // "template": " \uFD31 {{.Context}}{{if .Namespace}} :: {{.Namespace}}{{end}} "
74 //}
75 ],
76 "type": "prompt"
77 }
78 ],
79 "final_space": true,
80 "version": 2
81}
Aliases / Shortcuts
One other thing that may be useful to you is to create aliases for common commands you use. You can set up whatever you want - just give some thought to what works best for you.
I've got the following set up:
1New-Alias npp "C:\Program Files\Notepad++\notepad++.exe"
2New-Alias which Get-Command
3New-Alias docker podman
The above means that I can type npp $profile and it will open my powershell
profile using Notepad++ - which is super handy for me.
I can also use which to find where a program in my path lives, and
I'm using Podman Desktop as an alternative to
Docker Desktop and the above creates a handy alias.
Color Schemes (optional)
If you want to change the color scheme of the terminal from the default, you can go into the terminal settings and find the "Color Schemes" node.
You can explore and try the built in ones and add more on your own. If you
click the + Add New button, you'll have to provide values for 20 different
colors.
Alternatively, there's an Open JSON file in the bottom bar of the terminal
window that will show you the json settings file for the terminal.
In the schemes array, you can add another item into the array. Each
item looks like this - with a value for the 20 different colors you need:
 1{
 2  "name": "Campbell Powershell",
 3  "background": "#012456",
 4  "black": "#0C0C0C",
 5  "blue": "#0037DA",
 6  "brightBlack": "#767676",
 7  "brightBlue": "#3B78FF",
 8  "brightCyan": "#61D6D6",
 9  "brightGreen": "#16C60C",
10  "brightPurple": "#B4009E",
11  "brightRed": "#E74856",
12  "brightWhite": "#F2F2F2",
13  "brightYellow": "#F9F1A5",
14  "cursorColor": "#FFFFFF",
15  "cyan": "#3A96DD",
16  "foreground": "#CCCCCC",
17  "green": "#13A10E",
18  "purple": "#881798",
19  "red": "#C50F1F",
20  "selectionBackground": "#FFFFFF",
21  "white": "#CCCCCC",
22  "yellow": "#C19C00"
23}
Note the name property of the scheme (which needs to be unique in the
list of schemes). Once you have added a scheme and given it a name, you
can choose it as the default color scheme or for specific profiles (like
PowerShell versus Ubuntu or something).
I'm a huge fan of the Dracula (and its PRO variants) theme.
Terminal Icons (optional)
This is simply something that will give you nice icons when listing the contents of a directory -- so use optionally.
Here is a repo with the details: https://github.com/devblackops/Terminal-Icons
To get this goodness, you need to install the terminal icons:
1Install-Module -Name Terminal-Icons -Repository PSGallery
Then in your $profile file (the same one mentioned above), add this line:
1Import-Module -Name Terminal-Icons