Secure Web APIs With Swagger, Swashbuckle, and OAuth2 (Part 2)
This article continues the process started in part 1 which concluded with us having an API that has both anonymous and secure methods that can be called, and a Swagger interface provided by Swashbuckle. What remains now is the real meat of what I was trying to accomplish:
- Making sure we can use the Swagger interface for testing authenticated API calls (this article)
- Getting the Swagger interface customized enough so that it fits in with the rest of the site (part 3)
- Securing the Swagger interface so that only authenticated users can see it (part 4)
Each of the items above is kind of “its own beast” so I’ll just take them in order, thinking that getting a testable API is probably first on your list.
Setting up Swagger to make authenticated API calls
Getting authenticated calls set up in Swagger involves three changes to your API application, assuming your OAuth2 server is already ready to receive the authorization requests for apis.
First, modify SwaggerConfig to enable OAuth support
There are three places in SwaggerConfig.cs that need to be modified, and the current NuGet package’s version has them all simply
commented out to begin with. Somewhere around 70 lines down in SwaggerConfig.cs, you’ll need to comment in some lines of code and make them
look like this (or just add these lines):
1c.OAuth2("oauth2")
2      .Description("OAuth2 Implicit Grant")
3      .Flow("implicit")
4      .AuthorizationUrl(Helpers.GetIssuerUri() + "/connect/authorize")
5      .Scopes(scopes =>
6      {
7          scopes.Add("sampleapi", "try out the sample api");
8      });
Of the hard-coded strings above, a few are important:
- “implicit” –> this indicates we will be using an implicit flow for OAuth2.
- AuthorizationUrl –> this string uses our
Helpers.GetIssuerUrimethod defined in part 1 along with the authorize endpoint for the identity server - “sampleapi” –> this is a
scopethat will need to be predefined in your identity server
The next place is toward the middle of the file — around line 140:
1c.OperationFilter<AssignOAuth2SecurityRequirements>();
When you comment this in, the method AssignOAuth2SecurityRequirements will be undefined. That’s ok for now, we’ll come back to it in a second.
The last place in the file you need to modify is almost all the way to the bottom:
1c.EnableOAuth2Support("sampleapi", "samplerealm", "Swagger UI");
The sampleapi is the client id for your OAuth2 connection — which in this case happens to be the same as the scope defined above. It’s ok that they are
the same, but it is not required. The samplerealm and Swagger UI are the realm and appName parameters, which aren’t really used
in my case (but I did find out that you need a non-null, non-blank realm even if you are NOT using it).
Second, create the OperationFilter class
The class must implement IOperationFilter, which has a single method: Apply. The purpose of this class/method is to determine which of your
API methods in the Swagger interface will the OAuth settings be used for. If your API method (which is on the apiDescription parameter) needs
the OAuth toggle to show up, it should get an item added to the operation.security Dictionary as shown in the last line of the method associated
with the “oauth2” setting (the first hard-coded string above) and require the “sampleapi” scope.
The logic at the top of the method is all about determining whether we need to add the OAuth2 settings to the API method being evaluated. So, for example, anonymous methods can simply return without adding the security item to the Dictionary. The commented out code is left there as another example of how you might do this.
 1public class AssignOAuth2SecurityRequirements : IOperationFilter
 2{
 3    public void Apply(Operation operation, SchemaRegistry schemaRegistry, ApiDescription apiDescription)
 4    {
 5        var actFilters = apiDescription.ActionDescriptor.GetFilterPipeline();
 6        var allowsAnonymous = actFilters.Select(f => f.Instance).OfType<OverrideAuthorizationAttribute>().Any();
 7        if (allowsAnonymous)
 8            return; // must be an anonymous method
 9
10
11        //var scopes = apiDescription.ActionDescriptor.GetFilterPipeline()
12        //    .Select(filterInfo => filterInfo.Instance)
13        //    .OfType<AllowAnonymousAttribute>()
14        //    .SelectMany(attr => attr.Roles.Split(','))
15        //    .Distinct();
16
17        if (operation.security == null)
18            operation.security = new List<IDictionary<string, IEnumerable<string>>>();
19
20        var oAuthRequirements = new Dictionary<string, IEnumerable<string>>
21        {
22            {"oauth2", new List<string> {"sampleapi"}}
23        };
24
25        operation.security.Add(oAuthRequirements);
26    }
27}
Testing the OAuth flow with the APIs
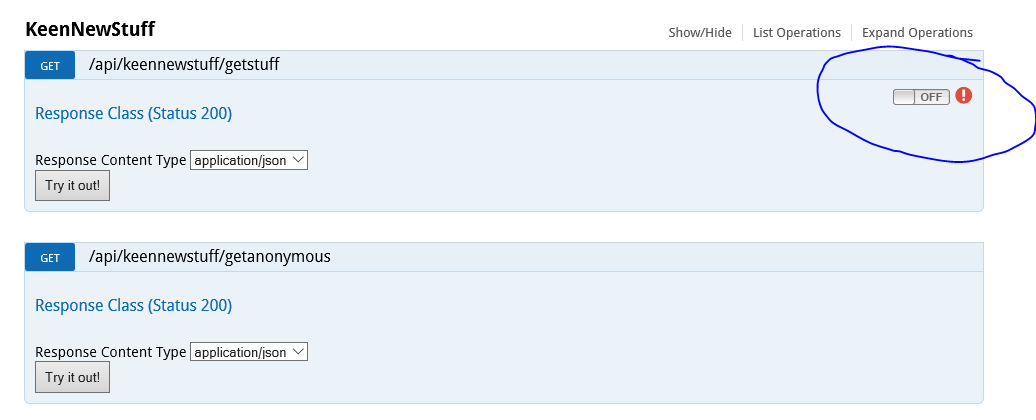
Now that you have made the changes above, everything should be in place to test it. When you go to the Swagger page and expand the operations, it should look like this — note the OAuth2 toggle in the secure method but NOT in the anonymous method:

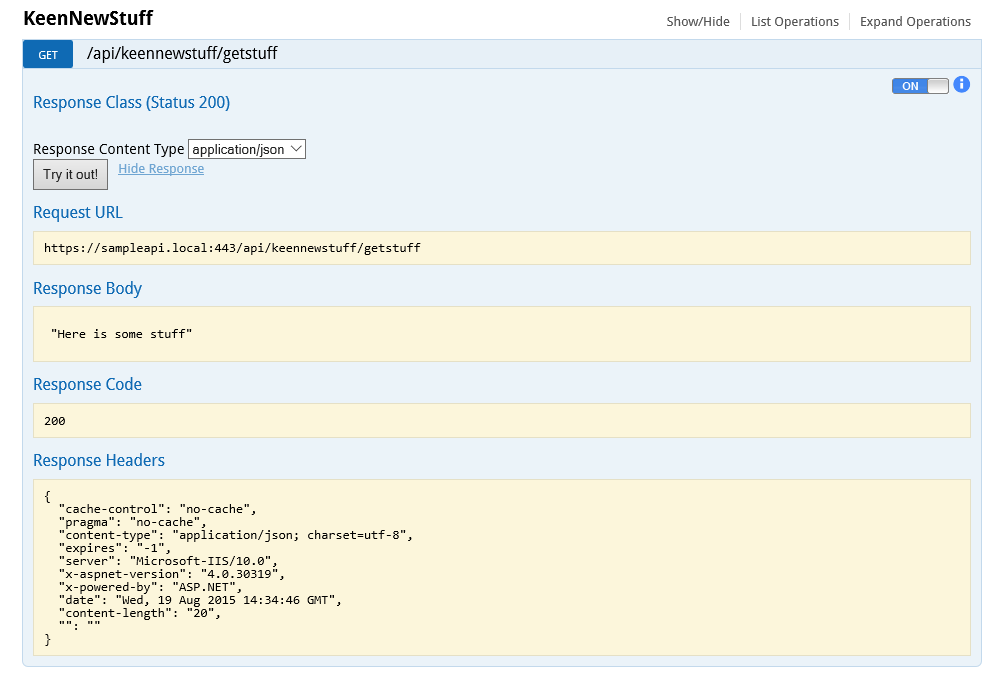
When you click the toggle, you will be presented with a preliminary consent screen for the scope you’ve defined and then be authenticated using an implicit flow with the identity server.
After completing authentication, the toggle should show “On”, and then any “Try it out” calls to the API will pass the bearer token received from the identity server. Then you can test the calls successfully, even if they require authorization! Sweet!

In the next two posts, we will customize the Swagger interface, and lock it down in case you only want authenticated users to be able to browse the API. Cheers!