TypeScript, Bootstrap and Kendo UI for jQuery - a powerful triple-threat!
Introduction
Creating great front-end web user experiences can be very intimidating – from good visual design, good user-friendly form components and elements (like date-pickers, combo boxes, etc), responsive design, and AJAX interactions. By leveraging the technology within TypeScript, Bootstrap, and Kendo UI for jQuery you can create awesome user experiences that will make visiting your site a joy for users rather than a burden.
All of the code and a working project can be found in my GitHub repository.
Background
I come from a background of ASP.NET server-side web technologies like WebForms and MVC. You can do AJAX-y kind of things there, but you really have to think about it. The technologies I’m describing here are a GREAT way to also start to bridge the gap toward full SPA-type applications using larger frameworks like Angular and Aurelia. Also, if you’ve started to add JavaScript code to your web pages, it can quickly get out of control and very hard to maintain if you have complex logic and interactions. The technologies here provide some awesome benefits that help guide you down the path to better user experiences. They include:
- Awesome layout and styling elements from Bootstrap — this enables responsive design (i.e. mobile and desktop-friendly layouts on your pages)
- Consistent coloring with Bootstrap
- 40+ UI controls with the open-source Kendo UI Core (30+ more key controls, like grid and chart) are available in the for-purchase version of Kendo
- Good separation of concerns via the MVVM framework within the Kendo UI Core – great data- syntax for initializing widgets
- Ability to use complex templates with the Kendo framework
- Strong design-time IntelliSense and error-checking through the use of TypeScript, plus a great debugging experience
This post is not an exhaustive exploration of all of the themes, components, or capabilities of ANY of the technologies involved, but should serve as a good launching platform for you. For more information on each of the different libraries and how to dig deeper, see Know Your Resources below.
Setup
Ultimately, you can perform the setup however you want. At some point, you need the following libraries in your project:
- jQuery (I’m using 3.1.1 in this post)
- Bootstrap (I’m using v 4 for this post)
- Kendo UI (core or professional — professional is paid, I’m using core for this post)
I installed them as Bower packages. Here are the commands to do so if you want to go this route:
1bower install jquery --save
2bower install bootstrap#v4.0.0-alpha.5 --save
3bower install kendo-ui-core --save
Once you’ve gotten the package installed, it’s time to set up the TypeScript. Install it from the TypeScript language site if you don’t already have it.
Then to get the typings files for our included libraries: you need to have the typings node module installed (step 1 below):
1npm install typings --global
2typings install dt~jquery --global --save
3typings install dt~bootstrap --global --save
4typings install dt~kendo-ui --global --save
Lastly, add a tsconfig.json to configure the TypeScript compiler for your project. It can look like the code below for you to get started.
 1{
 2  "compilerOptions": {
 3    "noImplicitAny": false,
 4    "noEmitOnError": true,
 5    "removeComments": false,
 6    "sourceMap": true,
 7    "target": "es5",
 8    "sourceRoot": "Scripts"
 9  },
10  "compileOnSave": true,
11  "exclude": [
12    "bower_components"
13  ]
14}
Hello World, View Model Style
A few preliminary explanations are in order regarding how these different components all wire together.
You will have a view — generally the same cshtml that that you would otherwise write. But in our case we won’t really have ANY JavaScript on the page other than the view models we will be including. As an aside, this is better for tight security policies because you won’t need “unsafe inline” for your JavaScript. Woo hoo!
In order for the view to talk with your view model, you will need a script reference to the transpiled view model on your page. And the bottom of your view model usually would contain an immediately-executed inline function (iffy) that “binds” your view model to the main div on your page.
Steps to get all of this set up for a little “hello, world” action:
- Identify or create a div on your view (page) that will serve as the root div to which you will bind a view model.
- Create a TypeScript file to hold your view model. Add typings refs for kendo and jquery, extend from
kendo.data.ObservableObject, add the constructor, and an iffy to bind the model.
 1/// <reference path="../typings/globals/jquery/index.d.ts" />
 2/// <reference path="../typings/globals/kendo-ui/index.d.ts" />
 3
 4module FormAwesomeIndex {
 5    export class ViewModel extends kendo.data.ObservableObject {
 6        constructor() {
 7            super();
 8            super.init(this);
 9        }
10    }
11}
12$(function () {
13    var viewModel = new FormAwesomeIndex.ViewModel();
14    kendo.bind($("#mainContainer"), viewModel);
15});
- Save your view model (the typescript file). If everything is set up properly, you should also now have a JS file next to the TS file on your file system. (it does not automatically get added to the project).
- Add a script tag referencing the JS file to your view
- Add some code that shows your view model is bound properly! This is where it gets F U N.
This step requires some VIEW code and some VIEW MODEL code. For the VIEW code, add a div like this to your HTML:
1<div class="alert alert-success" data-bind="html: helloViewModel"></div>
Regarding the data-bind syntax we added to the view, we are binding the helloViewModel field of the view model to the HTML content of the bound element, so the rendering will end up looking like
1<div class="alert alert-success">{value of viewModel.helloViewModel}</div>.
For the VIEW MODEL code, add code so that your view model looks like this: note the declaration of the field and the assignment of the value.
 1export class ViewModel extends kendo.data.ObservableObject {
 2        helloViewModel: string;
 3
 4        constructor() {
 5            super();
 6            super.init(this);
 7
 8            this.helloViewModel = "Hello from the View Model!";
 9        }
10    }
You should see something that looks like this when you run:

Add Some Kendo Form Elements
As noted, now that everything is set up, it starts getting pretty fun, and the limits are the controls available and your imagination.
A couple of nice first quick hits are to add a dropdown list and a date picker. Lets say we’d like to initialize the value of the drop-down picker in the view model (this could be from an AJAX request) and then fire a method on the view model when the drop-down value changes. All of this is SUPER-EASY.
Here’s the view code:
1<select data-role="dropdownlist"
2        data-bind="value: ddChoice, events: {change: ddChanged}"
3        data-value-primitive="true">
4    <option>First Choice</option>
5    <option>Second Choice</option>
6</select>
7
8<input data-role="datepicker" />
We could have bound the options for the dropdowns via the source binding — and optionally even used a complex type. The data-value-primitive simply directs the binding to use the actual VALUE when binding to a property in the view model — if you don’t set that to “true”, you will get an Object instead of a value (when options are bound to complex types) when the user selects a different option from the drop-down.
For the view model code, try the following (which just expands the last version of the view model):
 1export class ViewModel extends kendo.data.ObservableObject {
 2        ddChoice: string;
 3        helloViewModel: string;
 4
 5        constructor() {
 6            super();
 7            super.init(this);
 8
 9            this.ddChoice = "Second Choice";
10            this.helloViewModel = "Hello from the View Model!";
11        }
12
13
14        ddChanged(): void {
15            alert("changed!! (to " + this.ddChoice + ")");
16        }
17    }
Note that there isn’t a value on the view model to hold the value of the datepicker. Just add a Date field and bind the value on your view to it! You could even bind the datepicker’s change event to a function in the same way we did for the dropdownlist!
For more details about the data- syntax you would use in different situations, see Know Your Resources below, where I point out the data- section of the Kendo documentation for you.
Add a List Using Templates
So Bootstrap offers a nice dropdown button, and I wanted to see if I could bind drop-down options to something I set up inside the view model (which ultimately could be an AJAX API call, or whatever else. We will discuss the view, the view model, and the template in detail below.
The View
For this, I started with the basic Bootstrap HTML syntax for a drop-down button, shown below, and then added the binding markup for the source of the options and the template.
 1<div class="btn-group" role="group">
 2    <button id="btnGroupDrop1" type="button" class="btn btn-outline-primary dropdown-toggle"
 3          data-toggle="dropdown" aria-haspopup="true" aria-expanded="false">
 4              Add Shelf
 5    </button>
 6    <div class="dropdown-menu" data-bind="source: shelfOptions"
 7                               data-template="newShelfOptionTemplate">
 8        <!--<a class="dropdown-item" href="#">Dropdown link</a>
 9        <a class="dropdown-item" href="#">Dropdown link</a>-->
10    </div>
11</div>
Note two things about the above code block — the data-bind and data-template attributes, as well as the two commented
out <a> tags. An <a> tag like the commented out ones is what we are trying to create — except that when the option is
clicked we want to add an object (a new "shelf") to a list we are watching — a Kendo ObservableArray; to do this, we want
to bind the click event to a function on the view model.
The View Model
In the view model code below, the StringValue class was created because I was not able to figure out how to bind Kendo template content to a
simple string array. By creating the StringValue class with a single field called stringValue I was able to wire up the template
binding with no trouble at all.
The ViewModel class is where everything happens. The constructor method populates the shelfOptions field with the returned array
of StringValue items in the method below — this could pretty easily be the returned content from an API. Also in the constructor
is the initialization of an ObservableArray that we will add to when the drop-down button choice is clicked.
We have a method on the view model called addNewShelf that will be invoked when a drop-down choice is made. This method creates a new Shelf object
and adds it to the ObservableArray that we initialized in the constructor.
 1xport class StringValue {
 2    stringValue: string;
 3
 4    constructor(val: string) {
 5        this.stringValue = val;
 6    }
 7}
 8
 9export class ViewModel extends kendo.data.ObservableObject {
10    shelfOptions: StringValue[];
11    mediaShelves: kendo.data.ObservableArray;
12
13    constructor() {
14        super();
15        super.init(this);
16
17        this.set("shelfOptions", this.getShelfOptions());
18        this.set("mediaShelves", new kendo.data.ObservableArray([]));
19    }
20
21    getShelfOptions(): StringValue[] {
22        return [
23            new StringValue("Comics"),
24            new StringValue("Books"),
25            new StringValue("Movies"),
26            new StringValue("TV Shows"),
27            new StringValue("Music"),
28        ];
29    }
30
31    addNewShelf(e: any): void {
32        this.mediaShelves.push(new Shelf(e.currentTarget.innerHTML));
33    }
34}
The Template
A Kendo template is created with the use of a script tag, giving it an id attribute that is used to reference the template, and then defining content.
The content of the template below is just the drop-down option for the Bootstrap button group — with data bindings for its HTML content (the stuff that will be placed between the tag markers) and the click method.
1<script id="newShelfOptionTemplate" type="text/x-kendo-template">
2    <a class="dropdown-item" data-bind="html: stringValue, click: addNewShelf"></a>
3</script>
Going further….
You may have noticed that the addNewShelf method adds an item to an ObservableArray. If so, good on ya’! 🙂
The div that provides a placeholder for viewing the items in that ObservableArray is as follows:
I added another library for some of the code you’ll see below — it’s Font Awesome and it really is pretty nice. Great way to add font-based iconography to your site.
1<div id="mediaShelfListing" data-bind="source: mediaShelves"
2                            data-template="shelfTemplate"></div>
The mediaShelves property is the ObservableArray from the ViewModel, and we added a Shelf object to it, which is a bit more of a full-blown class.
The Shelf class itself was defined in another TypeScript file and is shown here:
 1export class Shelf extends kendo.data.ObservableObject {
 2        shelfType: string;
 3        shelfName: string;
 4        shelfContents: kendo.data.ObservableArray;
 5        shelfVisible: boolean;
 6
 7        constructor(type: string) {
 8            super();
 9            super.init(this);
10
11            this.set("shelfType", type);
12            this.set("shelfName", "");
13            this.set("shelfContents", new kendo.data.ObservableArray([]));
14            this.set("shelfVisible", true);
15        }
16
17        toggleShelf(e: any): void {
18            this.set("shelfVisible", !this.shelfVisible);
19            const newClass = this.shelfVisible ? "fa fa-chevron-up" : "fa fa-chevron-down";
20            e.currentTarget.className = newClass;
21        }
22
23        addNewItem(e: any): void {
24            this.shelfContents.push(new ShelfItem("made-up"));
25        }
26    }
The template for displaying a Shelf and its contents is a little more involved and I’ll just dump the code here and then point out a couple of things underneath the listing.
 1<script id="shelfTemplate" type="text/x-kendo-template">
 2    <div class="col-xs-12">
 3        <div class="card">
 4            <div class="card-block card-inverse card-primary ">
 5                <div class="col-md-10">
 6                    <h4 class="card-title" data-bind="html: shelfName"></h4>
 7                    <h6 class="card-subtitle" data-bind="html: shelfType"></h6>
 8                </div>
 9                <div class="col-md-1">
10                    <div class="btn btn-success" data-bind="events: {click: addNewItem}">Add</div>
11                </div>
12                <div class="col-md-1">
13                    <i class="fa fa-chevron-down"
14                        style="top: 6px; color: white; font-size: 24px; position: relative;"
15                        data-bind="events: {click: toggleShelf}"></i>
16                </div>
17            </div>
18            <div class="card-block" data-bind="visible: shelfVisible">
19
20                <div class="col-md-5">
21                    <div class="form-group row">
22                        <label for="example-text-input" class="col-xs-2 col-form-label">Shelf Name</label>
23                        <div class="col-xs-10">
24                            <input class="form-control" type="text" data-bind="value: shelfName">
25                        </div>
26                    </div>
27                </div>
28
29                <div class="col-md-7" data-bind="source: shelfContents" data-template="shelfItemTemplate"></div>
30
31            </div>
32        </div>
33    </div>
34</script>
Notes:
- I’m using the Bootstrap column and layout system here, along with their
cardcomponent. Check the docs if you want to know more — information and link below. - The
card-titleitem above is data-bound to theshelfNameproperty on the View Model, which can be edited via a form field inside the box — the form field is data-bound to the same field. - I’ve got a button in the card header that will “add an item to the shelf” — it uses the same technique as already reviewed to add an item to the
shelfContentsObservableArray and then theshelfItemTemplateis used to display the items. - I’ve got a font-awesome icon (up and down chevrons) to toggle the card (shelf) contents being visible or not — pretty slick!
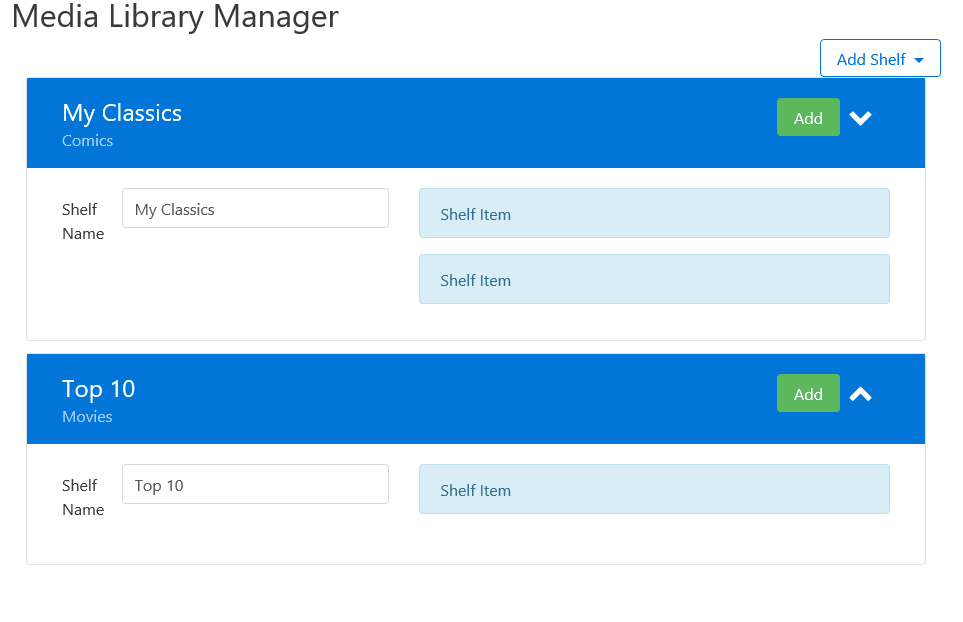
This is what it looks like with some basic choices and data entry done:
Know Your Resources
One of the most important tools at your disposal is the online documentation and resources around this technology.
The Kendo documentation and resources are the most complex, and here are some of the key resources that I continue to go back to regularly:
- Information about the Kendo data- syntax: This can help describe how to do basic things with data- attributes and the kendo conventions for how they are used. For example, data-role=”datetimepicker” is what you will use for a full date-time picker.
- General Kendo documentation: This includes documentation about the controls (Widgets), and the MVVM and templating frameworks (the latter is in the Framework and Utilities section). Note also the JavaScript API documentation here, which more exhaustively gets into properties, methods, and events for all of the controls.
- The Kendo Forums: Turns out other people are using the controls, too, and have posed lots of questions about how to get stuff down. You might think that StackOverflow and Google/Bing are really the place to find answers, but in many cases I’ve found what I needed by coming to the forums and searching there — even when my web search turned up disappointing results.
- The Kendo Demos: This is a great showcase of the functionality available — and I use it to explore what is possible and see how I might resolve a particular problem. They generally have the code / styling that goes along with the demos right there for you to look at, so it’s pretty helpful in that way, too.
- Bootstrap 4 documentation: This is really good information about the different components and layout features that are included with Bootstrap out of the box. Learn it, live it, love it. 🙂
To understand more about the differences between the open-source version of the Kendo library versus the professional one, see the Kendo Open Source information page.
Conquer the World
Between the Bootstrap layout, styling, and components, along with the Kendo UI framework and open-source controls, you have a LOT of tools at your disposal to make the creation of great user experiences a snap! And by using TypeScript, you can get strong typing to provide you with design-time rather than run-time checking of MANY of the types of problems that you might otherwise encounter only if/when a line of code is executed.
Happy coding!!
PS. I will likely add a future post to cover a couple of squirrely topics in this space such as:
- Making AJAX calls in the constructor and chaining a few of them together — processing data when all API calls have finished
- Handling dates with the datepicker. Hint: it involves the fact that you are bound to a JavaScript Date, and APIs / C# code like JSON dates rather than JavaScript ones
- Adding custom bindings for things like the MIN and MAX properties on the date picker