Controlling the Width of a Table With Read-the-Docs
"But I don’t want a scrollbar!!"
Read The Docs is a great platform for creating documentation that lets you focus on content rather
than complex markup syntax or making it searchable. One of the elements you might want to put in
your documentation is a table. There are different ways to create a table, and one that I like
is the list-table format.
Consider the following markup:
 1.. list-table:: Comparison
 2   :widths: 20 10 10 15 20
 3   :header-rows: 1
 4
 5   * - Platform
 6     - Self-Contained?
 7     - Cost
 8     - Flexibility
 9     - Description
10   * - Raspberry Pi
11     - No
12     - $30
13     - Limitless
14     - Mini computer board with GPIO pins for interfacing and experimentation.
15   * - Lego Mindstorms
16     - Yes
17     - $350
18     - Medium
19     - Lego robotics sytem with motors and sensors.  Build a robot, then write logic to move it around and do stuff.
The markup above creates the following table as shown in the following image; specifically note the horizontal scrollbar at the bottom:
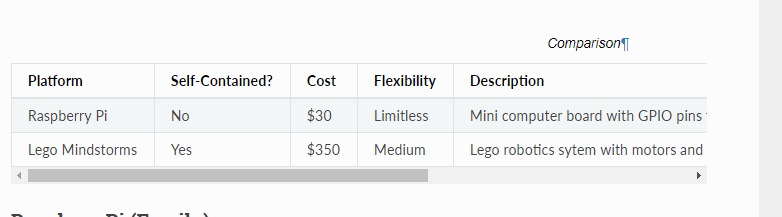
Often, there is good content to the right of what you can initially see, but there is no built-in option to keep the contents of the table directly in the viewing area.
Custom CSS to the rescue!
A little bit of custom CSS will enable what we’re after, but there are some specific steps to get the custom CSS into a Read The Docs project.
Create the custom CSS file
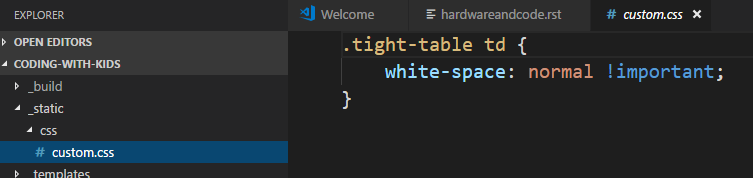
If you’ve created a Read The Docs project using sphinx-quickstart, you probably have a _static directory in your project folder. The image below shows the folder structure and the CSS code that you should add to the file. The class name of tight-table can be anything you want, but we will use it again later so keep track of it if you change it.
Get the custom CSS into the built output
Just putting the CSS there will not allow you to reference the class yet — it needs to be copied to the HTML built output that gets created when you “make” the project.
To do this, add the following code to you conf.py file:
1def setup(app):
2   app.add_stylesheet('css/custom.css')
The path in the above code is relative to the _static folder in your doc project. The setup function is something that the Read The Docs build process will look for and run automatically if it’s available.
Reference the class
Back in the original document with your table, you can now simply reference the class as shown in the code snippet below.
1.. list-table:: Comparison
2   :widths: 20 10 10 15 20
3   :header-rows: 1
4   :class: tight-table
5
6   * - Platform
7     . . .
Yay! No more scrollbar!
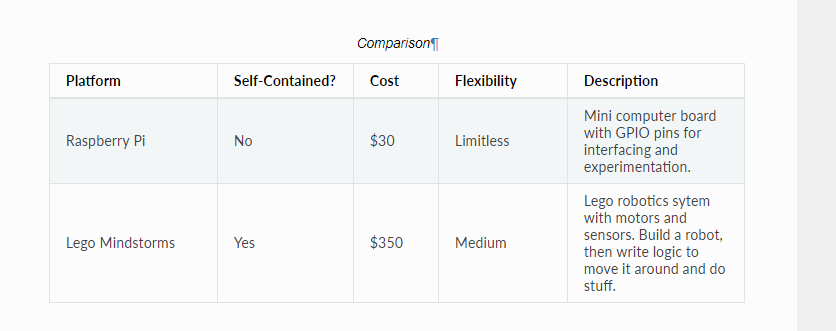
When you build the project with all of these changes in place, you now get a table that looks as shown below — the content is all visible without scrolling!!!
Want more??
If you want to know more about Read The Docs, from anything from Sphinx tips, hosting the project on your own or inside ReadTheDocs.org, the Git workflow that goes along with it, versioning, and more, I encourage you to check out my Pluralsight course titled Build or Contribute to Documentation with a Git-based Workflow.